stage 06
调色与一致性处理
Color Grading & Consistency
Inktoys — 3DGS Tutorial Series · Chapter 06 · Color Grading & Consistency
Concept & Positioning
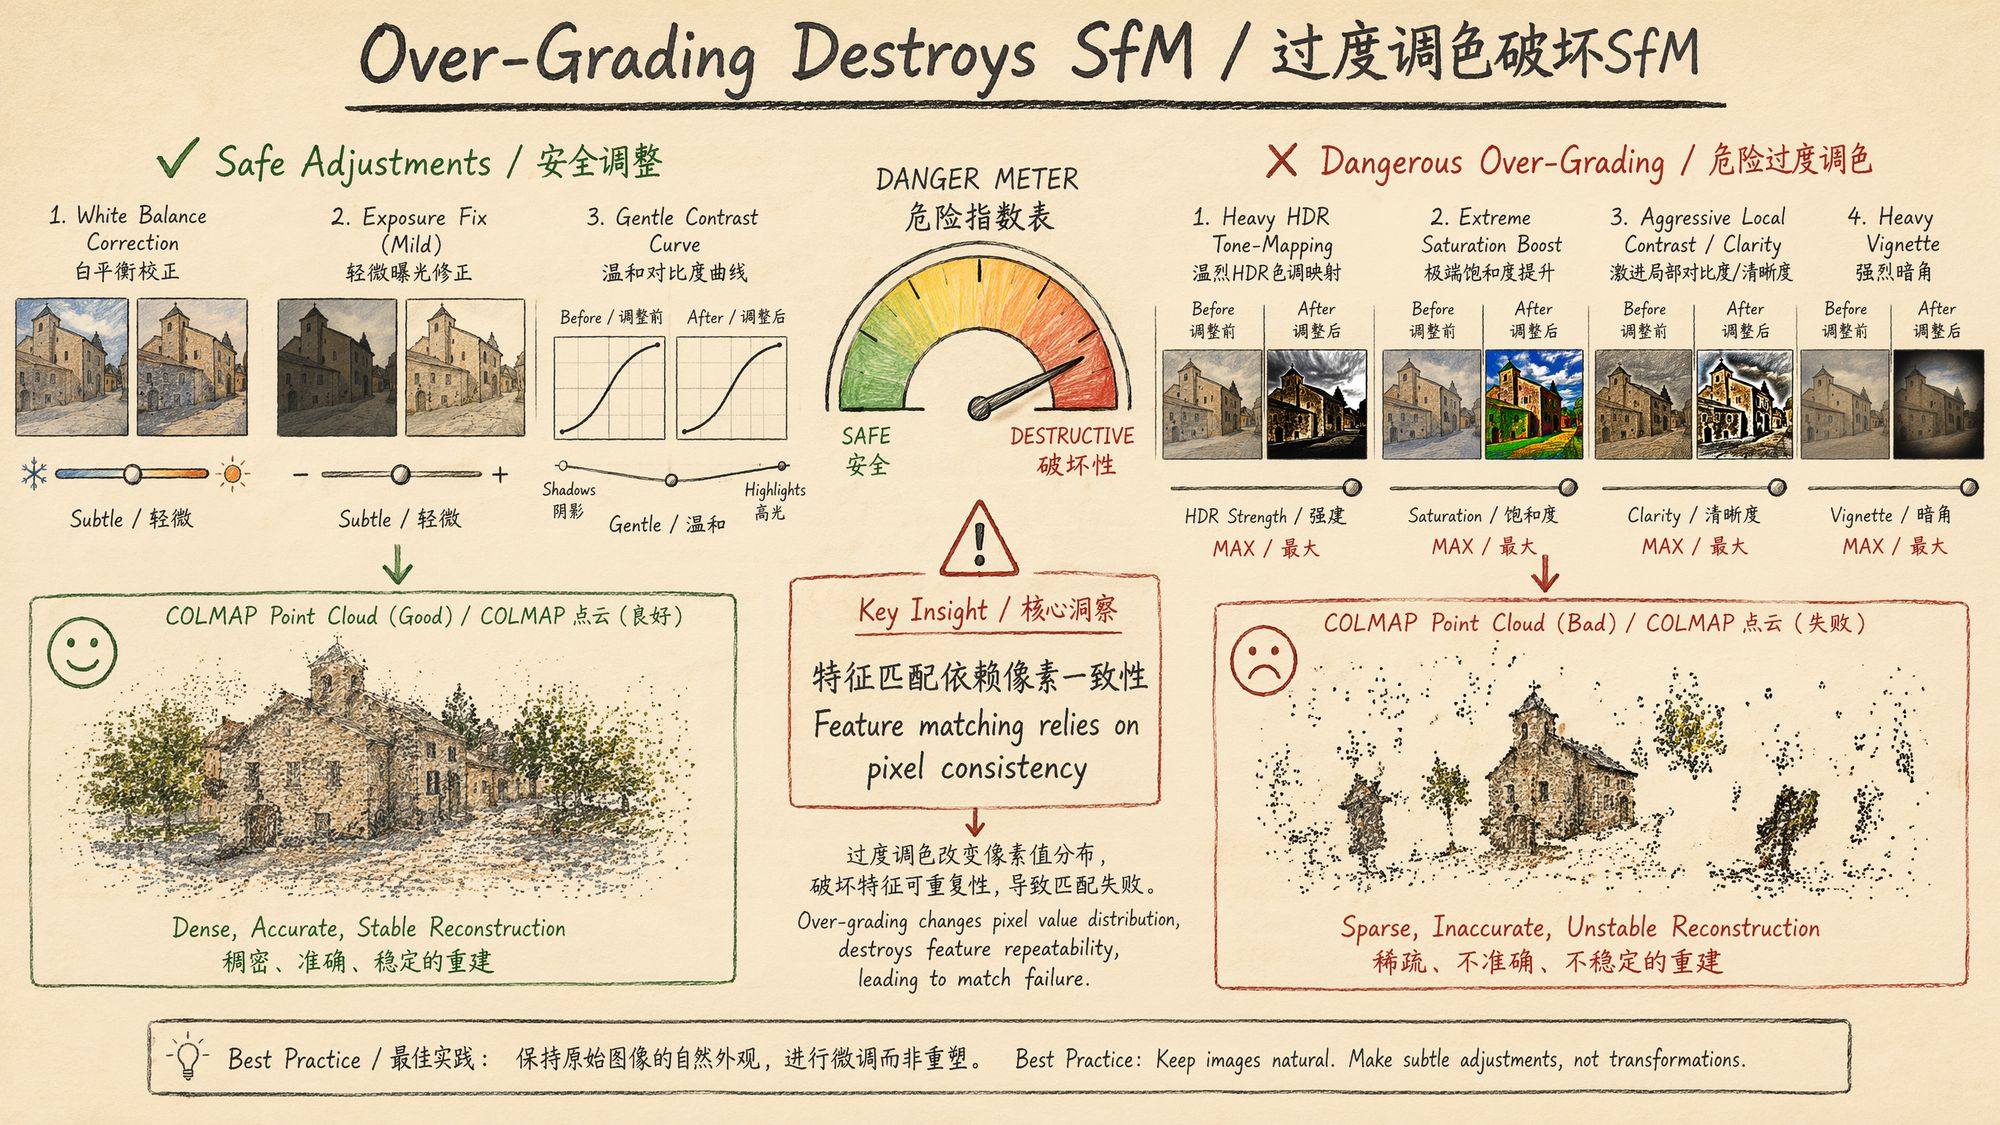
Color grading is the most easily underestimated — and most easily overdone — step in the 3DGS pipeline. Its core objective is singular: ensure that every input frame stays physically consistent in lighting and color, so that downstream SfM feature matching achieves the highest possible success rate.
This is not creative color grading for photography or film — you are not chasing a cinematic look or an emotional mood. You are correcting the unavoidable lighting fluctuations introduced during capture and pulling every frame back to a single shared baseline in color space. Push too hard and feature points fail to match because pixel values get warped non-linearly. Push too little and the same physical surface shows up in different colors across frames, leading COLMAP to mis-classify them as different regions.
Core principle: the purpose of color grading is to restore truth, not to create style.
Why Color Consistency Matters for 3DGS
3D Gaussian Splatting training is fundamentally about finding pixel-level correspondences between multi-view images. When the same physical surface looks different from frame to frame:
-
SfM stage: feature descriptors such as SIFT and SuperPoint are reasonably robust to brightness and contrast shifts, but they have almost zero tolerance for hue shifts and non-linear tone mapping. Color inconsistency directly raises feature-matching failure rates by 30–60%.
-
Gaussian optimization stage: each Gaussian carries spherical harmonics (SH) to model view-dependent color. If the inputs themselves are inconsistent, the optimizer "learns" the capture errors into the SH coefficients, which manifests as color blotches and flickering in the final renders.
-
Novel view synthesis: color chaos in training is amplified at synthesis time — you will see colors jumping around as you orbit the model.
Decision Points
Decision 1: Do You Need Color Grading?
| Capture Condition | Need Grading? | Reason |
|---|---|---|
| Outdoor overcast, captured within 10 minutes | ❌ Usually not | Diffuse light is extremely stable |
| Outdoor sunny with passing clouds | ✅ Required | Cloud occlusion causes 1–2 stops of exposure swing |
| Indoor, single artificial light source | ❌ Usually not | Constant illuminant |
| Indoor mixed lighting (daylight + lamps) | ✅ Required | Color temperature varies across regions |
| Video frame extraction with auto-exposure on | ✅ Required | Camera auto-adjustments cause inter-frame drift |
| RAW capture with manual exposure locked | ⚠️ Light correction only | Slight white-balance drift may still occur |
Inktoys' Take: if you locked manual exposure, manual white balance, and the lighting truly never changed during capture, you can skip grading and go straight to SfM. In practice that perfect scenario is rare — it is far safer to run one mild batch correction than to feed color-inconsistent images into COLMAP.
Decision 2: Choosing a Grading Tool
| Tool | Use Case | Strengths | Limitations |
|---|---|---|---|
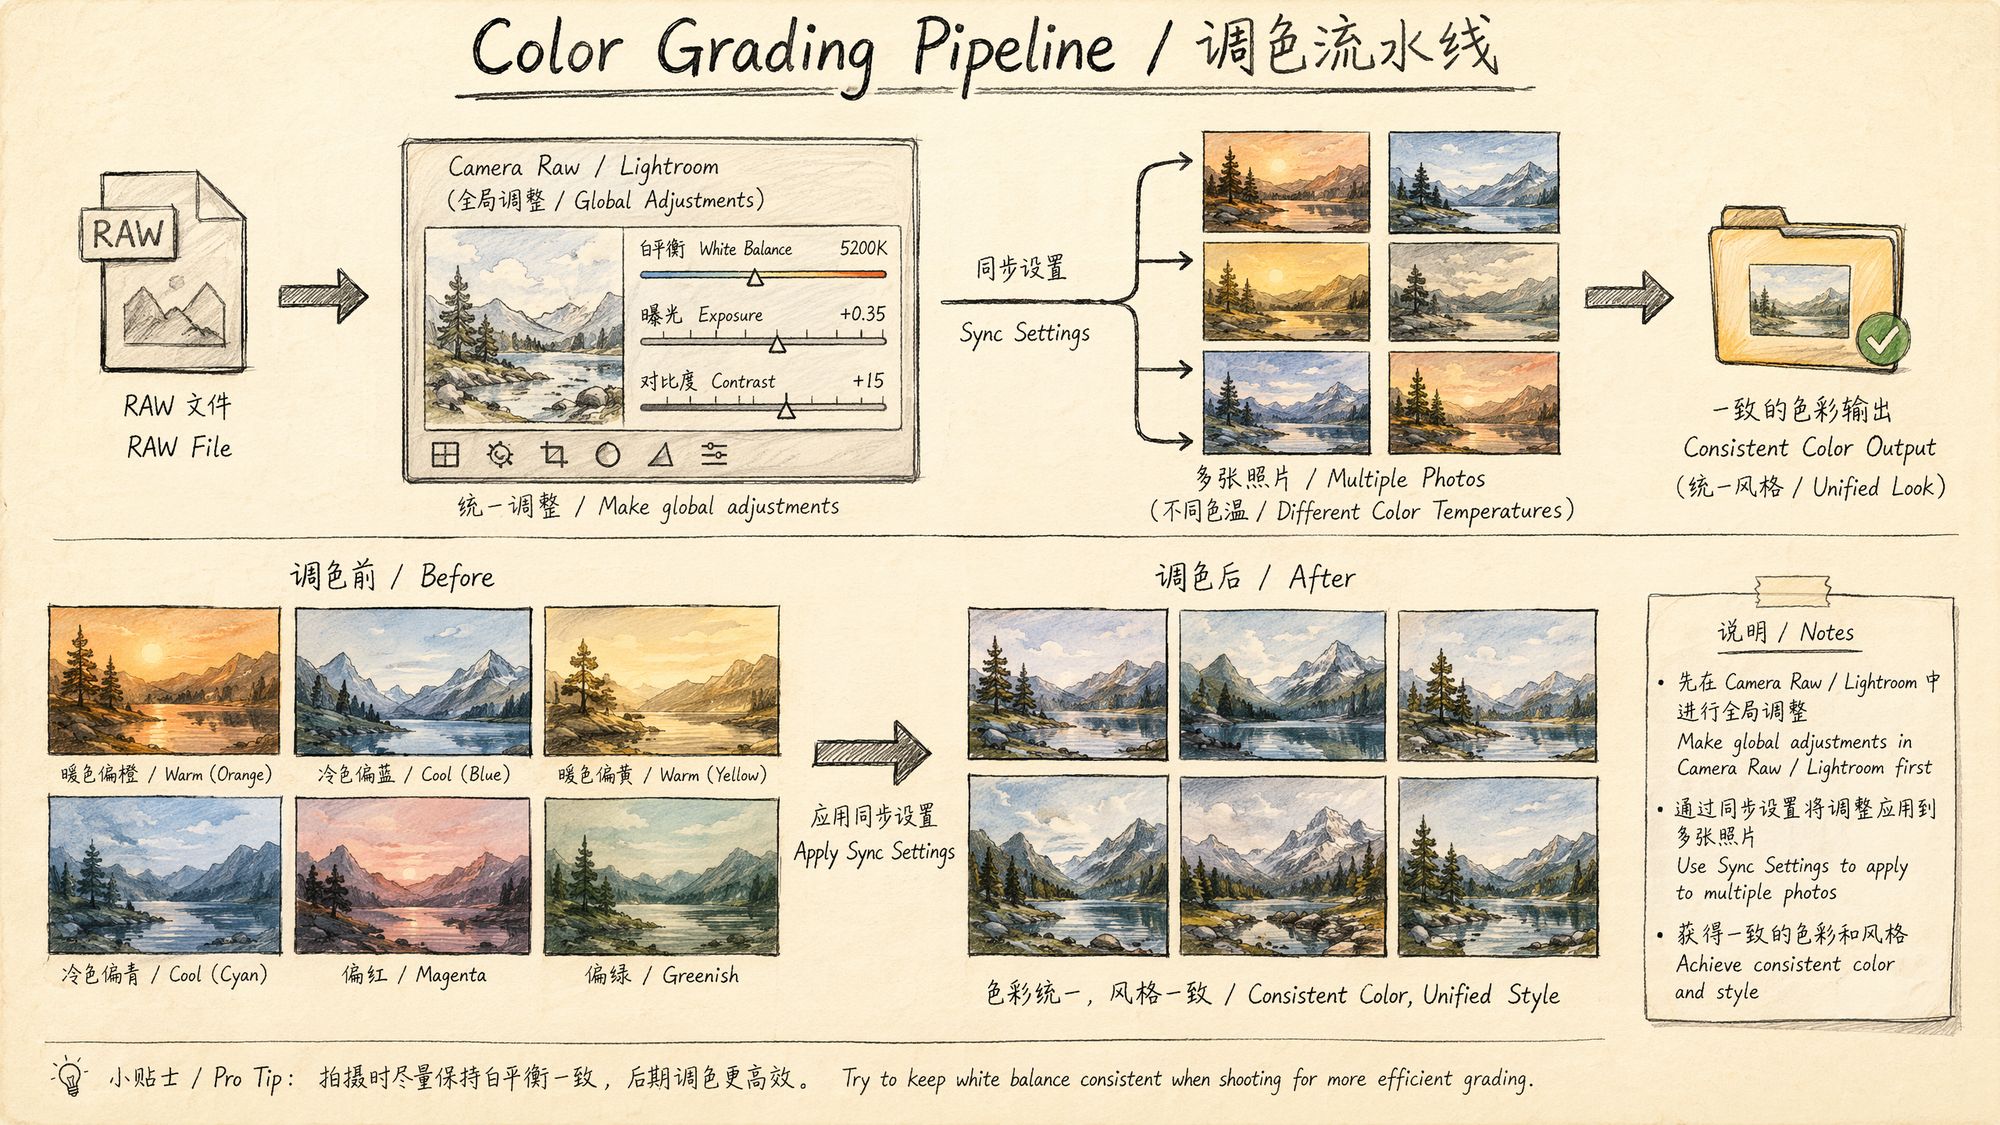
| Adobe Camera Raw / Lightroom | RAW batch processing | Non-destructive, settings sync, profile support | Requires RAW source |
| DaVinci Resolve | Video sources | Node-based grading, powerful color-space management | Steep learning curve |
| RawTherapee (open source) | RAW batch processing | Free, supports CLI batch | Dated UI |
| Python + OpenCV | Automated batch correction | Fully programmable, easy to integrate into a pipeline | Requires coding |
| darktable (open source) | RAW batch processing | Free, supports XMP sidecars | Mediocre performance |
Inktoys' Recommendation: for RAW captures, the "Sync Settings" feature in Lightroom / Camera Raw is the first choice; for video-extracted JPEG/PNG frames, a Python automation script for histogram alignment is the way to go.
Decision 3: How Far to Go? Where Are the Safety Boundaries?
This is the most important decision in the chapter. Operations are listed below from lowest to highest risk:
| Operation | Risk Level | Impact on SfM |
|---|---|---|
| White balance unification | 🟢 Safe | Linear transform, does not affect features |
| Exposure compensation ±1 stop | 🟢 Safe | Linear scaling, feature descriptors tolerate it |
| Mild contrast adjustment | 🟡 Low risk | Slightly non-linear, generally acceptable |
| Highlight / shadow recovery | 🟡 Low risk | Local tone mapping, safe in small amounts |
| Clarity / Texture | 🟠 Medium risk | Alters edge pixel values, may disturb keypoint localization |
| Saturation / Vibrance | 🟠 Medium risk | Non-linear color transform |
| HSL per-hue adjustment | 🔴 High risk | Breaks inter-channel color relationships |
| S-curve tone enhancement | 🔴 High risk | Strong non-linear mapping |
| Local adjustments (gradient / radial filters) | 🔴 Extreme risk | Different transforms in different regions, directly destroys geometric consistency |
| LUT / film presets | 🔴 Extreme risk | Complex non-linear lookup tables, completely unpredictable |
| Vignette / Dehaze | 🔴 Extreme risk | Spatially-varying brightness modification |
Operation Steps
Step 1: Assess Current Color Consistency
Before reaching for a slider, quantify how inconsistent the footage actually is.
Method A: visual histogram inspection
In Lightroom, select all frames and switch to Survey View (shortcut N), then watch the histograms. If the histograms have similar shapes but are shifted, you only need a simple exposure / white-balance correction. If the shapes themselves differ significantly, the lighting condition has fundamentally changed.
Method B: Python automated assessment
import cv2 import numpy as np from pathlib import Path import json
def analyze_color_consistency(image_dir: str) -> dict:
"""Analyze color consistency across a set of images"""
stats = []
for img_path in sorted(Path(image_dir).glob("*.jpg")):
img = cv2.imread(str(img_path))
if img is None:
continue
# Convert to LAB color space (closer to human perception)
lab = cv2.cvtColor(img, cv2.COLOR_BGR2LAB)
l, a, b = cv2.split(lab)
stats.append({
"file": img_path.name,
"L_mean": float(l.mean()),
# Luminance mean
"L_std": float(l.std()),
# Luminance std
"a_mean": float(a.mean()),
# Green-red axis mean
"b_mean": float(b.mean()),
# Blue-yellow axis mean
"rgb_mean": img.mean(axis=(0,1)).tolist(),
})
# Coefficient of variation across frames
L_values = [s["L_mean"] for s in stats]
a_values = [s["a_mean"] for s in stats]
b_values = [s["b_mean"] for s in stats]
report = {
"total_frames": len(stats),
"brightness_range": max(L_values) - min(L_values),
"brightness_cv": np.std(L_values) / np.mean(L_values),
# Coefficient of variation
"color_a_range": max(a_values) - min(a_values),
"color_b_range": max(b_values) - min(b_values),
"needs_correction": False,
"severity": "none"
}
# Decide whether correction is needed
if report["brightness_range"] > 30:
report["needs_correction"] = True
report["severity"] = "high"
elif report["brightness_range"] > 15:
report["needs_correction"] = True
report["severity"] = "medium"
elif report["color_a_range"] > 10 or report["color_b_range"] > 10:
report["needs_correction"] = True
report["severity"] = "low"
return report
# Usage example report = analyze_color_consistency("./frames/") print(json.dumps(report, indent=2)) # brightness_range > 30 -> correction required # brightness_range 15-30 -> correction recommended # brightness_range < 15 and color range < 10 -> can skip
Decision thresholds:
| Metric | Safe | Needs Correction | Severely Inconsistent |
|---|---|---|---|
| Brightness range (L_range) | < 15 | 15–30 | > 30 |
| Chrominance range (a/b_range) | < 8 | 8–15 | > 15 |
| Brightness coefficient of variation (CV) | < 0.05 | 0.05–0.10 | > 0.10 |
Step 2: White Balance Unification (the Most Important Step)
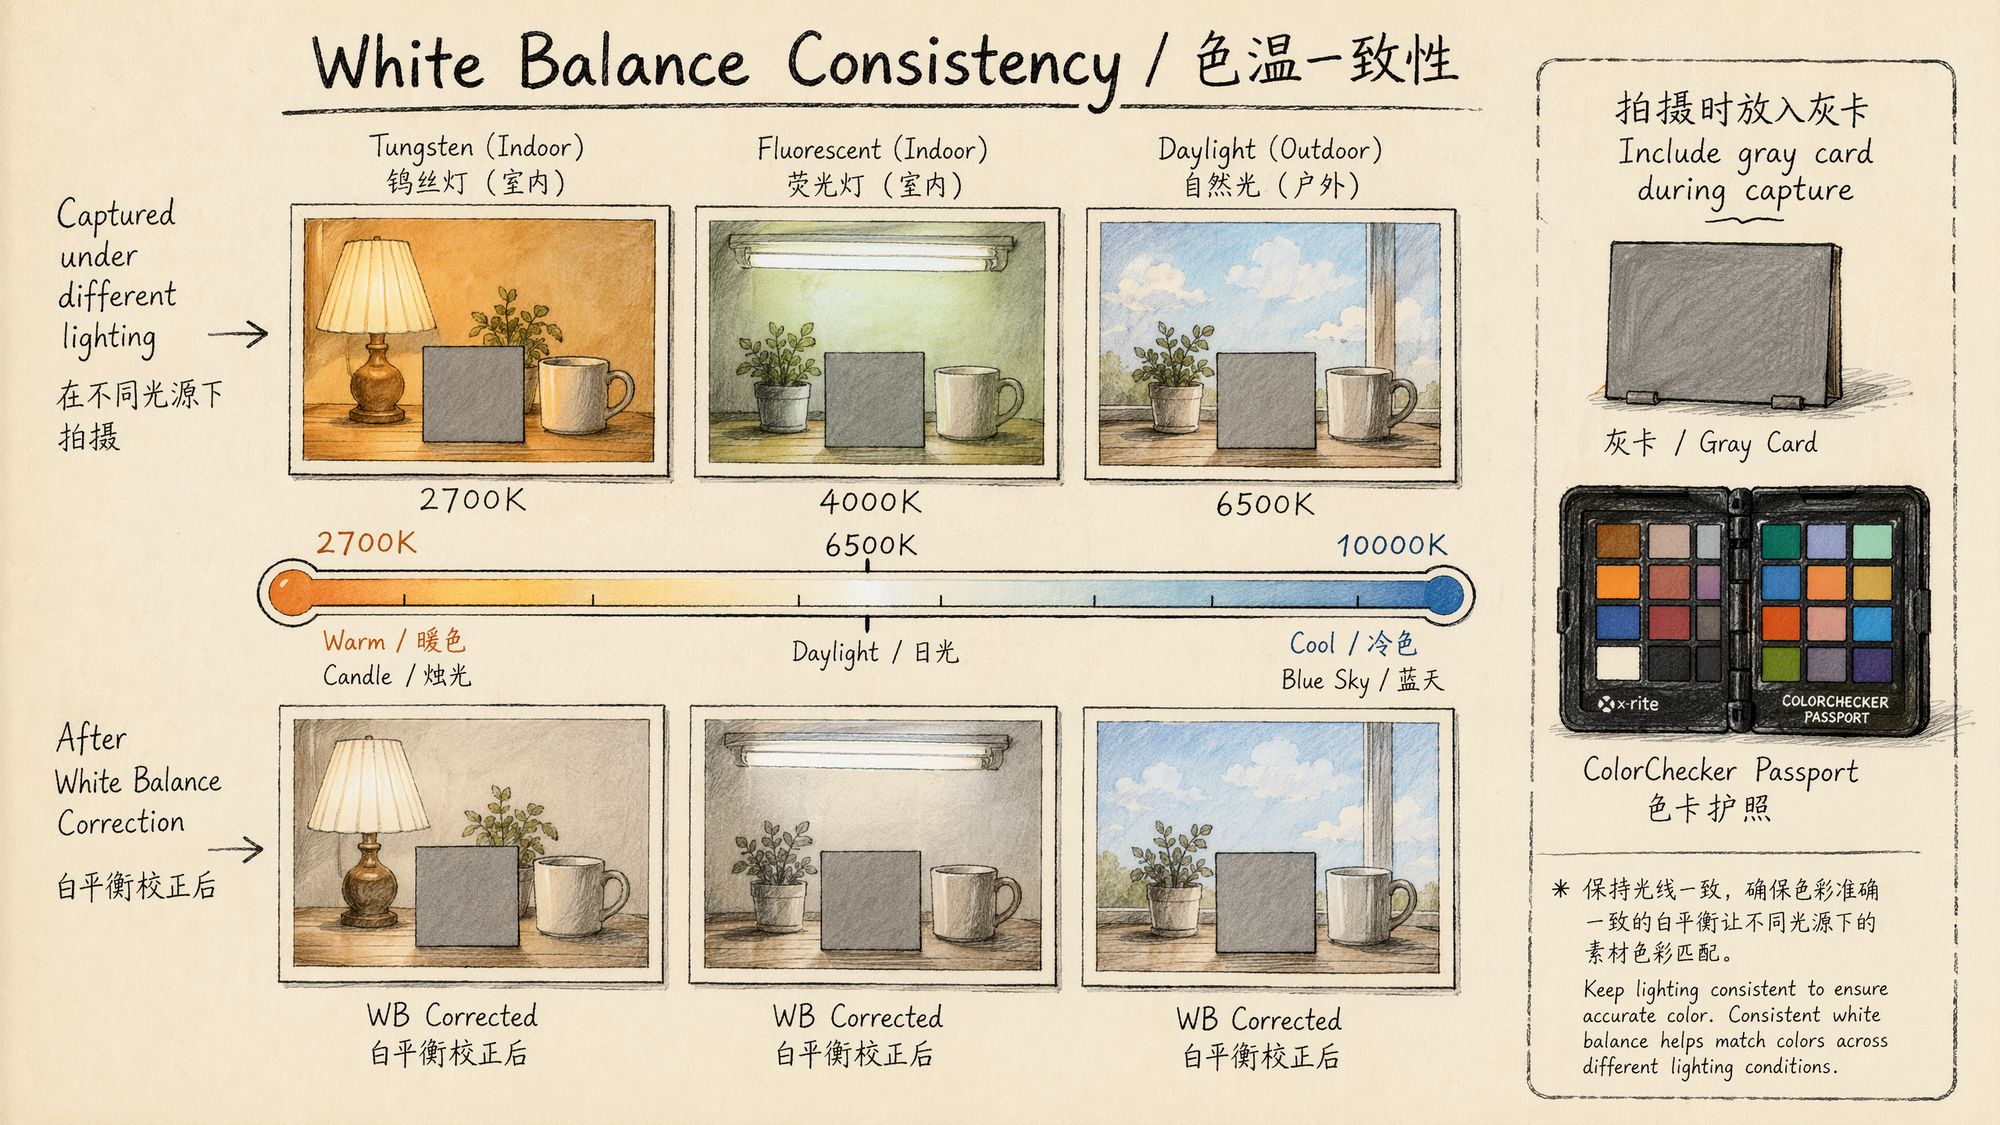
Inconsistent white balance is the single most common problem in 3DGS footage. Auto White Balance (AWB) lets the camera retune color temperature on a per-frame basis, so the same object ends up warmer in some frames and cooler in others.
Method A: Lightroom / Camera Raw batch (recommended for RAW)
-
Import all RAW files into Lightroom.
-
Pick the frame whose lighting looks most "standard" as the reference (if you shot a gray card, pick the frame containing it).
-
Use the white-balance eyedropper on the gray card or a known neutral-gray region.
-
Note the resulting Temp (K) and Tint values.
-
Select all frames -> right-click -> "Sync Settings…" -> tick only "White Balance".
-
Apply the sync.
Key detail: if you do not have a gray card, pick a region you are certain should be neutral gray (concrete floor, the shadow side of a white wall, stainless steel surface). Avoid colored objects or anything lit by colored light.
Method B: Python auto white-balance unification (for JPEG/PNG)
import cv2 import numpy as np from pathlib import Path
def estimate_illuminant_gray_world(img: np.ndarray) -> np.ndarray:
"""Estimate illuminant color temperature using the gray-world assumption"""
avg_b = img[:,:,0].mean()
avg_g = img[:,:,1].mean()
avg_r = img[:,:,2].mean()
avg_all = (avg_b + avg_g + avg_r) / 3
gains = np.array([avg_all/avg_b, avg_all/avg_g, avg_all/avg_r])
return gains
def apply_white_balance(img: np.ndarray, gains: np.ndarray) -> np.ndarray:
"""Apply white-balance gains"""
result = img.astype(np.float32)
result[:,:,0] *= gains[0]
# B
result[:,:,1] *= gains[1]
# G
result[:,:,2] *= gains[2]
# R
return np.clip(result, 0, 255).astype(np.uint8)
def unify_white_balance(image_dir: str, output_dir: str, method: str = "reference"):
"""
Unify white balance
method:
- "reference": use the first frame as reference
- "median": use the median across all frames as reference
- "daylight": force D65 daylight white balance
"""
Path(output_dir).mkdir(parents=True, exist_ok=True)
paths = sorted(Path(image_dir).glob("*.jpg"))
if method == "reference":
# Use the first frame's white balance as the target
ref_img = cv2.imread(str(paths[0]))
target_gains = estimate_illuminant_gray_world(ref_img)
elif method == "median":
# Median gains across all frames
all_gains = []
for p in paths:
img = cv2.imread(str(p))
all_gains.append(estimate_illuminant_gray_world(img))
target_gains = np.median(all_gains, axis=0)
elif method == "daylight":
# D65 daylight: assume perfect white balance = unit gains per channel
target_gains = np.array([1.0, 1.0, 1.0])
for p in paths:
img = cv2.imread(str(p))
current_gains = estimate_illuminant_gray_world(img)
# Correction factor from current WB to target WB
correction = target_gains / current_gains
corrected = apply_white_balance(img, correction)
cv2.imwrite(str(Path(output_dir) / p.name), corrected,
[cv2.IMWRITE_JPEG_QUALITY, 98])
print(f"Processed {len(paths)} images, output to {output_dir}")
# Usage unify_white_balance("./frames/", "./frames_wb/", method="median")
Step 3: Exposure Alignment
Once white balance is unified, the next step is to bring overall brightness into alignment across frames.
Method A: Lightroom batch exposure sync
If exposure differences across frames stay within ±1 stop, simply syncing the Exposure value works fine. When the differences are larger (clouds drifting in dropped some frames by 2 stops, for example), you should group them:
-
Sort by brightness (Lightroom can sort by the "Exposure" metadata).
-
Group obviously dark / bright frames separately.
-
Adjust each group's exposure to match the dominant group.
-
Confirm at the end that the histograms across the full selection look consistent.
Method B: Python histogram matching
import cv2 import numpy as np from pathlib import Path
def match_histogram_lab(source: np.ndarray, reference: np.ndarray) -> np.ndarray:
"""
Histogram matching in LAB space (matches the L channel only)
Keeps color information intact, only aligns brightness distribution
"""
src_lab = cv2.cvtColor(source, cv2.COLOR_BGR2LAB).astype(np.float32)
ref_lab = cv2.cvtColor(reference, cv2.COLOR_BGR2LAB).astype(np.float32)
# Mean-variance match on L only (gentler than full histogram matching)
src_l = src_lab[:,:,0]
ref_l = ref_lab[:,:,0]
# Linear transform: align source L mean and variance to the reference
src_mean, src_std = src_l.mean(), src_l.std()
ref_mean, ref_std = ref_l.mean(), ref_l.std()
# Avoid division by zero
if src_std < 1e-6:
src_std = 1e-6
matched_l = (src_l - src_mean) * (ref_std / src_std) + ref_mean
src_lab[:,:,0] = np.clip(matched_l, 0, 255)
result = cv2.cvtColor(src_lab.astype(np.uint8), cv2.COLOR_LAB2BGR)
return result
def batch_exposure_align(image_dir: str, output_dir: str):
"""Batch exposure alignment using the median-brightness frame as reference"""
Path(output_dir).mkdir(parents=True, exist_ok=True)
paths = sorted(Path(image_dir).glob("*.jpg"))
# Per-frame brightness
brightness = []
for p in paths:
img = cv2.imread(str(p))
lab = cv2.cvtColor(img, cv2.COLOR_BGR2LAB)
brightness.append(lab[:,:,0].mean())
# Pick the median-brightness frame as reference
median_idx = np.argsort(brightness)[len(brightness)//2]
reference = cv2.imread(str(paths[median_idx]))
print(f"Reference frame: {paths[median_idx].name} (L_mean={brightness[median_idx]:.1f})")
for i, p in enumerate(paths):
img = cv2.imread(str(p))
# Only correct when delta exceeds the threshold (avoid unnecessary processing)
if abs(brightness[i] - brightness[median_idx]) > 5:
img = match_histogram_lab(img, reference)
cv2.imwrite(str(Path(output_dir) / p.name), img,
[cv2.IMWRITE_JPEG_QUALITY, 98])
print(f"Exposure alignment complete, processed {len(paths)} frames")
batch_exposure_align("./frames_wb/", "./frames_aligned/")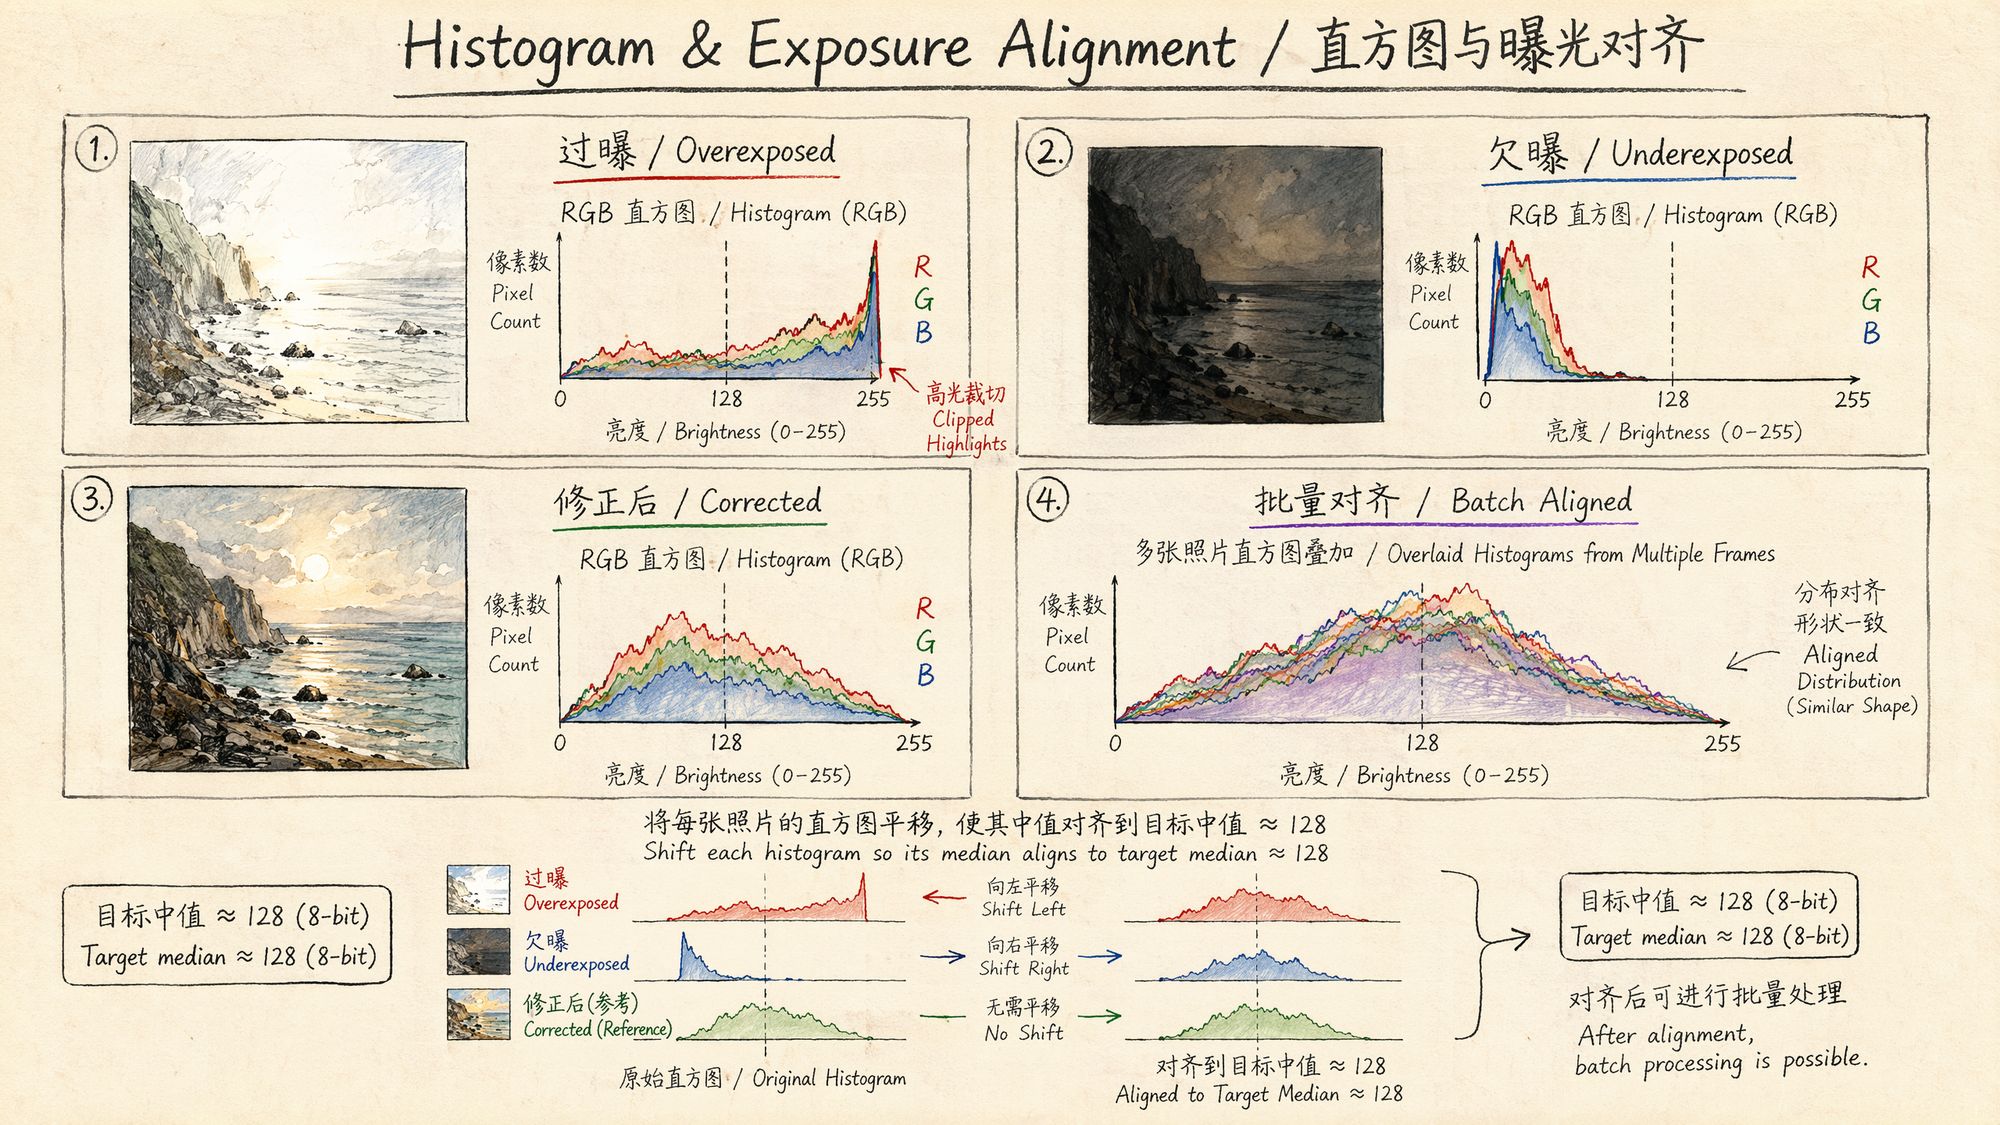
Step 4: Contrast & Tone Fine-tuning (Tread Carefully)
Once white balance and exposure are unified, if the result still looks flat (low contrast), you may apply an extremely mild global contrast adjustment.
Lightroom safe parameter ranges:
| Parameter | Safe Range | Never Exceed |
|---|---|---|
| Contrast | -10 to +15 | ±30 |
| Highlights | -30 to 0 | -100 (creates HDR artifacts) |
| Shadows | 0 to +20 | +100 (amplifies noise) |
| Whites | -10 to +10 | ±30 |
| Blacks | -10 to 0 | -30 |
| Clarity | 0 | Any positive value is risky |
| Texture | 0 | Any positive value is risky |
| Dehaze | 0 | Any positive value is risky |
| Vibrance | -5 to +5 | ±20 |
| Saturation | 0 | Any non-zero value is risky |
Key principle: contrast adjustments must be global, linear, and uniform across all frames. Never use local adjustment tools (radial filter, graduated filter, adjustment brush) — they apply different transforms to different regions of the image, which directly destroys the geometric consistency SfM relies on.
Step 5: Export Settings
The export settings matter just as much as the grading itself.
Lightroom export configuration:
Format: JPEG (quality 95-98%) or TIFF (lossless) or PNG Color space: sRGB (mandatory! Do not use Adobe RGB or ProPhoto RGB) Resolution: keep original, do not resize Sharpening: OFF (output sharpening alters edge pixels) Metadata: keep all (focal-length info in EXIF is critical for SfM) File naming: keep the original sequence numbers so ordering is preservedWhy must we use sRGB?
COLMAP and most 3DGS training frameworks assume input images live in sRGB. If you export to Adobe RGB or ProPhoto RGB, those wide-gamut images will look over-saturated when read as sRGB, and different software handles them inconsistently, which leads to unpredictable training results.
Batch export validation script (Lightroom CLI / exiftool checks):
| BASH #!/bin/bash # Verify exported images meet requirements OUTPUT_DIR="./export/" echo "=== Checking export quality ===" # 1. Check color space echo "--- Color space check ---" exiftool -ColorSpace -ICCProfileName "$OUTPUT_DIR"/.jpg | grep -v "sRGB" | head -20 # 2. Check resolution consistency echo "--- Resolution check ---" exiftool -ImageWidth -ImageHeight "$OUTPUT_DIR"/.jpg | sort -u # 3. Check that EXIF focal length was preserved echo "--- Focal length check ---" exiftool -FocalLength "$OUTPUT_DIR"/.jpg | sort -u # 4. Check for abnormal file sizes (too small may indicate corruption) echo "--- File size check ---" find "$OUTPUT_DIR" -name ".jpg" -size -100k -print echo "=== Check complete ===" |
|---|
Step 6: Verify the Correction
Once you have exported the graded frames, always verify that consistency really did improve:
def verify_correction(original_dir: str, corrected_dir: str):
"""Compare consistency metrics before and after correction"""
report_before = analyze_color_consistency(original_dir)
report_after = analyze_color_consistency(corrected_dir)
print("=" * 50)
print("Before vs after correction")
print("=" * 50)
print(f"Brightness range: {report_before['brightness_range']:.1f} -> {report_after['brightness_range']:.1f}")
print(f"Brightness CV:
{report_before['brightness_cv']:.4f} -> {report_after['brightness_cv']:.4f}")
print(f"Chroma a range: {report_before['color_a_range']:.1f} -> {report_after['color_a_range']:.1f}")
print(f"Chroma b range: {report_before['color_b_range']:.1f} -> {report_after['color_b_range']:.1f}")
# Improvement rate
brightness_improvement = (1 - report_after['brightness_range'] /
max(report_before['brightness_range'], 0.01)) * 100
print(f" Brightness consistency improvement: {brightness_improvement:.0f}%")
if report_after['brightness_range'] < 15 and report_after['color_a_range'] < 8:
print("✅ Within target after correction, ready for SfM")
else:
print("⚠️ Still drifting, inspect the outlier frames")
verify_correction("./frames/", "./frames_aligned/")
End-to-End Automation Script
The steps above can be combined into a single end-to-end Python script:
#!/usr/bin/env python3 """ 06_color_consistency.py Inktoys · Color Grading & Consistency automation script Batch color correction for JPEG/PNG frames (use Lightroom for RAW files) """
import cv2 import numpy as np from pathlib import Path import argparse import json import shutil
class ColorConsistencyPipeline:
def __init__(self, input_dir: str, output_dir: str,
wb_method: str = "median",
brightness_threshold: float = 5.0,
skip_if_consistent: bool = True):
self.input_dir = Path(input_dir)
self.output_dir = Path(output_dir)
self.wb_method = wb_method
self.brightness_threshold = brightness_threshold
self.skip_if_consistent = skip_if_consistent
self.output_dir.mkdir(parents=True, exist_ok=True)
def analyze(self) -> dict:
"""Step 1: analyze current consistency"""
print("[1/4] Analyzing color consistency...")
stats = []
paths = sorted(self.input_dir.glob("*.jpg")) + \
sorted(self.input_dir.glob("*.png"))
for p in paths:
img = cv2.imread(str(p))
if img is None:
continue
lab = cv2.cvtColor(img, cv2.COLOR_BGR2LAB)
l, a, b = cv2.split(lab)
stats.append({
"path": p,
"L_mean": float(l.mean()),
"a_mean": float(a.mean()),
"b_mean": float(b.mean()),
})
L_vals = [s["L_mean"] for s in stats]
a_vals = [s["a_mean"] for s in stats]
b_vals = [s["b_mean"] for s in stats]
self.stats = stats
self.report = {
"total_frames": len(stats),
"L_range": max(L_vals) - min(L_vals),
"L_cv": np.std(L_vals) / np.mean(L_vals),
"a_range": max(a_vals) - min(a_vals),
"b_range": max(b_vals) - min(b_vals),
}
needs_wb = self.report["a_range"] > 8 or self.report["b_range"] > 8
needs_exposure = self.report["L_range"] > 15
self.report["needs_wb"] = needs_wb
self.report["needs_exposure"] = needs_exposure
print(f"
Frame count: {len(stats)}")
print(f"
Brightness range: {self.report['L_range']:.1f} ({'needs correction' if needs_exposure else 'OK'})")
print(f"
Chroma range: a={self.report['a_range']:.1f}, b={self.report['b_range']:.1f} "
f"({'needs correction' if needs_wb else 'OK'})")
return self.report
def correct_white_balance(self):
"""Step 2: white balance unification"""
if not self.report["needs_wb"] and self.skip_if_consistent:
print("[2/4] White balance already consistent, skipping")
return
print(f"[2/4] Unifying white balance (method={self.wb_method})...")
# Compute target gains
all_gains = []
for s in self.stats:
img = cv2.imread(str(s["path"]))
avg = img.mean(axis=(0,1))
avg_all = avg.mean()
gains = avg_all / (avg + 1e-6)
all_gains.append(gains)
if self.wb_method == "median":
target_gains = np.median(all_gains, axis=0)
elif self.wb_method == "reference":
target_gains = all_gains[0]
else:
# daylight
target_gains = np.array([1.0, 1.0, 1.0])
for i, s in enumerate(self.stats):
img = cv2.imread(str(s["path"])).astype(np.float32)
correction = target_gains / (all_gains[i] + 1e-6)
img *= correction[np.newaxis, np.newaxis, :]
img = np.clip(img, 0, 255).astype(np.uint8)
out_path = self.output_dir / s["path"].name
cv2.imwrite(str(out_path), img, [cv2.IMWRITE_JPEG_QUALITY, 98])
print(f"
Processed {len(self.stats)} frames")
def align_exposure(self):
"""Step 3: exposure alignment"""
if not self.report["needs_exposure"] and self.skip_if_consistent:
print("[3/4] Exposure already consistent, skipping")
return
print("[3/4] Aligning exposure...")
# Use white-balance-corrected images if available
source_dir = self.output_dir if any(self.output_dir.iterdir()) else self.input_dir
paths = sorted(source_dir.glob("*.jpg")) + sorted(source_dir.glob("*.png"))
# Compute brightness and pick the median frame
brightness = []
for p in paths:
img = cv2.imread(str(p))
lab = cv2.cvtColor(img, cv2.COLOR_BGR2LAB)
brightness.append(lab[:,:,0].mean())
median_idx = np.argsort(brightness)[len(brightness)//2]
ref = cv2.imread(str(paths[median_idx]))
ref_lab = cv2.cvtColor(ref, cv2.COLOR_BGR2LAB).astype(np.float32)
ref_L_mean = ref_lab[:,:,0].mean()
ref_L_std = ref_lab[:,:,0].std()
for i, p in enumerate(paths):
if abs(brightness[i] - brightness[median_idx]) <= self.brightness_threshold:
# Delta below threshold, copy directly
if source_dir != self.output_dir:
shutil.copy2(str(p), str(self.output_dir / p.name))
continue
img = cv2.imread(str(p))
lab = cv2.cvtColor(img, cv2.COLOR_BGR2LAB).astype(np.float32)
src_L_mean = lab[:,:,0].mean()
src_L_std = lab[:,:,0].std() + 1e-6
lab[:,:,0] = (lab[:,:,0] - src_L_mean) * (ref_L_std / src_L_std) + ref_L_mean
lab[:,:,0] = np.clip(lab[:,:,0], 0, 255)
result = cv2.cvtColor(lab.astype(np.uint8), cv2.COLOR_LAB2BGR)
cv2.imwrite(str(self.output_dir / p.name), result,
[cv2.IMWRITE_JPEG_QUALITY, 98])
print(f"
Reference frame: {paths[median_idx].name}")
print(f"
Processed {len(paths)} frames")
def verify(self) -> dict:
"""Step 4: verify the correction"""
print("[4/4] Verifying correction result...")
paths = sorted(self.output_dir.glob("*.jpg")) + \
sorted(self.output_dir.glob("*.png"))
L_vals, a_vals, b_vals = [], [], []
for p in paths:
img = cv2.imread(str(p))
lab = cv2.cvtColor(img, cv2.COLOR_BGR2LAB)
l, a, b = cv2.split(lab)
L_vals.append(l.mean())
a_vals.append(a.mean())
b_vals.append(b.mean())
final_report = {
"L_range": max(L_vals) - min(L_vals),
"a_range": max(a_vals) - min(a_vals),
"b_range": max(b_vals) - min(b_vals),
"L_cv": np.std(L_vals) / np.mean(L_vals),
}
passed = final_report["L_range"] < 15 and \
final_report["a_range"] < 10 and \
final_report["b_range"] < 10
print(f"
Post-correction brightness range: {final_report['L_range']:.1f}")
print(f"
Post-correction chroma range: a={final_report['a_range']:.1f}, b={final_report['b_range']:.1f}")
print(f"
{'✅ Passed! Ready for SfM' if passed else '⚠️ Still drifting, manual inspection recommended'}")
return final_report
def run(self):
"""Run the complete pipeline"""
print("=" * 60)
print("Inktoys · Color Grading & Consistency")
print("=" * 60)
self.analyze()
if not self.report["needs_wb"] and not self.report["needs_exposure"]:
if self.skip_if_consistent:
print(" ✅ Footage is already color-consistent; copying directly to output")
for s in self.stats:
shutil.copy2(str(s["path"]), str(self.output_dir / s["path"].name))
return
self.correct_white_balance()
self.align_exposure()
self.verify()
print(" " + "=" * 60)
print("Done! Output directory:", self.output_dir)
print("=" * 60)
if __name__ == "__main__":
parser = argparse.ArgumentParser(description="3DGS footage color consistency processing")
parser.add_argument("input", help="Input image directory")
parser.add_argument("output", help="Output image directory")
parser.add_argument("--wb-method", choices=["median","reference","daylight"],
default="median", help="White balance method")
parser.add_argument("--threshold", type=float, default=5.0,
help="Brightness delta threshold (no correction below this)")
parser.add_argument("--force", action="store_true",
help="Force correction (even if already consistent)")
args = parser.parse_args()
pipeline = ColorConsistencyPipeline(
args.input, args.output,
wb_method=args.wb_method,
brightness_threshold=args.threshold,
skip_if_consistent=not args.force
)
pipeline.run()
Usage:
# Basic usage python 06_color_consistency.py ./frames/ ./frames_corrected/
# Force correction + use the first frame as the white-balance reference python 06_color_consistency.py ./frames/ ./frames_corrected/ --wb-method reference --force
# Looser threshold (correct only frames with large drift) python 06_color_consistency.py ./frames/ ./frames_corrected/ --threshold 10
Special Scenarios
Scenario A: Mixed Lighting Environments
When a scene contains daylight (5500K) and tungsten (3200K) at the same time, different regions are physically supposed to have different color temperatures — that is the reality and you should not "unify" it away.
The right approach: only unify the white-balance baseline (so all frames respond consistently to the same illuminant); do not try to remove the intra-scene color-temperature differences.
# Mixed-lighting scenes: only enforce inter-frame consistency, not intra-frame uniformity # Use the "reference" method, anchored on the frame that contains the most scene information pipeline = ColorConsistencyPipeline(
"./frames/", "./frames_corrected/",
wb_method="reference",
# Avoid daylight, keep the scene-lighting signature
brightness_threshold=3.0
# Stricter threshold )
Scenario B: Gradient Lighting (Sunrise / Sunset Captures)
If your capture spans a long period (for example a 30-minute sunset), the lighting itself is changing continuously. Forcing every frame to the same color temperature in this case introduces severe artifacts.
The right approach:
-
Group frames by time (for example one group every 5 minutes).
-
Run consistency correction within each group.
-
Allow natural transitions between groups.
-
Or: use only the time window during which lighting changed least.
Scenario C: Flash / Strobe Captures
When using flash, the exposure delta between flash frames and ambient frames can hit 3–4 stops.
The right approach: do not mix them. Use either all-flash or all-ambient frames. If mixing is unavoidable, drop the flash frames' exposure to match the ambient frames (you lose SNR but preserve consistency).
Common Errors & Troubleshooting
| Symptom | Likely Cause | Solution |
|---|---|---|
| COLMAP match count drops sharply | Over-grading destroyed feature descriptors | Roll back to lighter parameters, or fall back to original frames |
| Reconstructed model has color blotches | Inter-frame color is still inconsistent | Look for frames that were skipped during correction |
| Color shift after export | Color space is not sRGB | Re-export and confirm color-space settings |
| Banding / noise in shadows | Shadow recovery pushed too hard | Lower shadow lift, accept some loss of dark detail |
| Some frames are obviously off-color | AWB misjudged those frames | Manually correct just those frames |
| False color in highlights | Highlight-recovery algorithm introduced artifacts | Reduce highlight recovery, or discard the affected frame |
| SfM fails after sharpening | Output sharpening altered edge pixels | Disable all output sharpening |
| EXIF focal length missing | Metadata was not preserved on export | Re-export with "Preserve all metadata" enabled |
Troubleshooting Flow
COLMAP matching failed? +-- Check: did you grade? │
+-- Yes -> rerun COLMAP on the original frames for comparison │
│
+-- Originals succeed -> over-graded, lighten the parameters │
│
+-- Originals also fail -> issue is not the grading, check other chapters │
+-- No -> grading is not the cause +-- Check: did you use any local adjustments? │
+-- Yes -> remove all local adjustments immediately +-- Check: did you apply a LUT or preset? │
+-- Yes -> remove it, keep only basic adjustments +-- Check: is the export color space sRGB?
+-- No -> re-export as sRGB
Inktoys' Take
On the question "should I color-grade?", my position is unambiguous:
In the 3DGS pipeline, color grading is an operation with an extremely asymmetric risk-reward profile. Get it right and you might gain a 5–10% boost in matching rate. Get it wrong and you can sink the entire reconstruction.
My actual workflow looks like this:
-
Solve it during capture: lock manual exposure, lock manual white balance, use a constant light source. This is 100× more effective than any post-processing fix.
-
If you must grade, do exactly two things: white-balance unification + exposure alignment. Touch nothing else.
-
Always keep the originals: graded frames go in a separate directory. The first reaction whenever COLMAP misbehaves is to swap back to the originals and try again.
-
Verify, verify, and verify again: right after grading, run a quick COLMAP pass (lower resolution, a subset of frames) to confirm matching has not regressed. Do not wait until the full pipeline finishes to discover that grading broke things.
One-line summary: the color-grading philosophy for 3DGS is "minimum intervention". Your goal is to make what the camera saw consistent, not to make the picture look prettier. Looking pretty is the rendering stage's job.
Further Reading
• Schönberger, J. L. & Frahm, J. M. (2016). "Structure-from-Motion Revisited." CVPR. — the original COLMAP paper, useful for understanding what feature matching demands of image quality.
• Mildenhall, B. et al. (2022). "NeRF in the Wild: Neural Radiance Fields for Unconstrained Photo Collections." — a classic approach for handling lighting-inconsistent inputs (appearance embedding).
• Kerbl, B. et al. (2023). "3D Gaussian Splatting for Real-Time Radiance Field Rendering." — the original 3DGS paper.
• Martin-Brualla, R. et al. (2021). "NeRF in the Wild" — discusses transient appearance handling.
• Adobe Camera Raw official documentation: batch processing and Sync Settings.
• darktable official documentation: CLI batch mode.
• OpenCV color-space conversion documentation.
DaVinci Resolve Workflow (for Video Sources)
If your source material is video (rather than RAW stills), DaVinci Resolve offers a more professional grading workflow:
Basic Flow
-
Import to a timeline: drop the video into Resolve and work on the Color page.
-
Set up color management: Project Settings -> Color Management -> select DaVinci YRGB Color Managed.
-
Apply base corrections:
◦ Use the Primary Wheels for global white balance.
◦ Use Lift / Gamma / Gain for three-zone exposure adjustments.
◦ Use the Parade scope to confirm RGB-channel alignment.
- Critical: use Shot Match.
◦ Pick a reference frame -> right-click -> "Shot Match to this Clip".
◦ Resolve will compute the corrections needed for the other clips.
◦ This is more efficient and more consistent than adjusting frame-by-frame.
- Export as a frame sequence:
◦ Deliver page -> format set to JPEG / TIFF sequence.
◦ Color space: Rec.709 / sRGB.
◦ Do not add any Power Grade or LUT.
Safe Operations Inside Resolve
| Operation | Safety |
|---|---|
| Primary Color Wheels (global) | ✅ Safe |
| Curves (global RGB) | ✅ Safe (small amounts) |
| Shot Match | ✅ Safe |
| Qualifier (HSL key) | ❌ Forbidden |
| Power Window (local mask) | ❌ Forbidden |
| OFX plugins | ❌ Forbidden |
| Film Grain | ❌ Forbidden |
| Noise Reduction (temporal) | ⚠️ Caution (may alter inter-frame relationships) |