stage 05
帧抽取与素材筛选
Frame Extraction & Selection
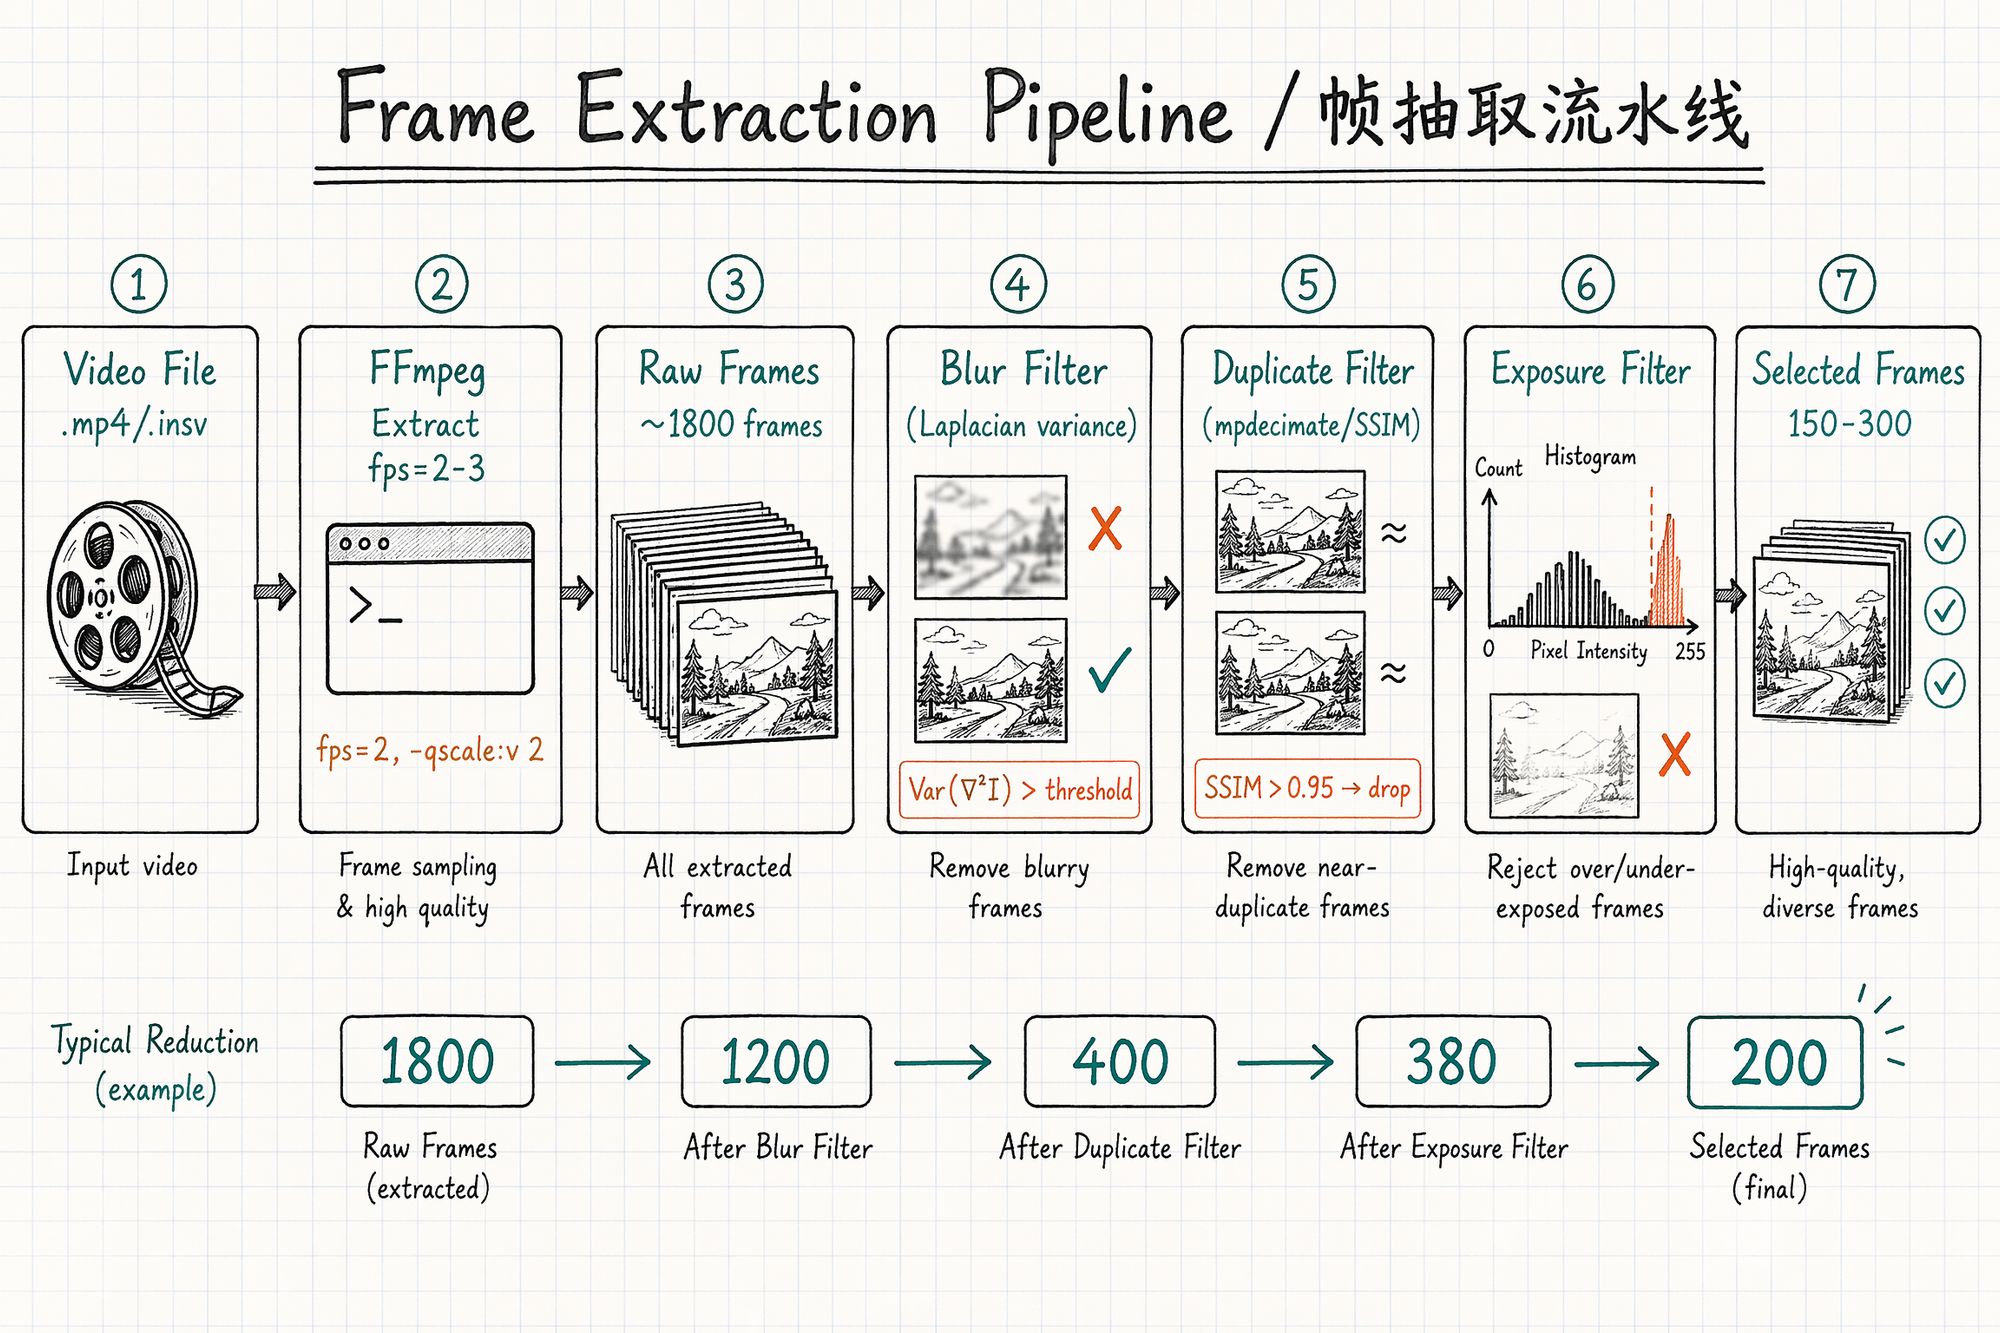
Frame Extraction Pipeline Overview
The entire process is a pipeline: raw video → coarse extraction → blur filter → duplicate filter → exposure filter → selected frames → (optional) mask generation.
Typical count reduction:
| Stage | Frame count (10-min video example) | Notes |
|---|---|---|
| Raw video | 36,000 (60fps × 600s) | All frames |
| Coarse extraction (2fps) | ~1,200 | FFmpeg time-interval extraction |
| After blur filter | ~900 | Remove motion-blurred frames ~25% |
| After duplicate filter | ~350 | Remove high-similarity redundant frames ~60% |
| After exposure filter | ~300 | Remove over/underexposed frames ~15% |
| Final selection | 200–300 | Human spot-check confirmation |
Step 1: FFmpeg Coarse Extraction
FFmpeg is the Swiss Army knife of frame extraction. Core idea: extract at a fixed frame rate while preserving maximum quality.
Basic Command Template
-vf "fps=2" \
-qscale:v 2 \
-start_number 001 \
output/frame_%04d.jpg
Parameter explanation:
| Parameter | Meaning | Recommended value |
|---|---|---|
| -vf "fps=2" | Extract 2 frames per second | Walking speed: 2fps, slow orbit: 1fps |
| -qscale: v 2 | JPEG quality (1=highest, 31=lowest) | 2 (near-lossless) |
| -start_number 001 | Output file starting number | 001 |
| %04d | Four-digit zero-padded | Ensures correct sorting |
Extraction Rate by Scenario
| Capture method | Movement speed | Recommended fps | Reason |
|---|---|---|---|
| Handheld walking (indoor) | ~0.5m/s | 2 fps | ~25cm between frames, ~75% overlap |
| Handheld walking (outdoor) | ~1m/s | 3 fps | ~33cm between frames, ~70% overlap |
| Tripod slow pan | ~0.2m/s | 1 fps | ~20cm between frames, >80% overlap |
| Drone flight | ~3m/s | 2 fps | ~1.5m between frames, with 70% overlap |
| Action camera fast sweep | ~2m/s | 4 fps | Fast movement needs denser sampling |
Rule of thumb: Extraction rate = movement speed (m/s) × 2 ÷ frame width coverage (m). Target: ≥70% overlap between adjacent frames.
Advanced: mpdecimate Auto-Deduplication
FFmpeg's built-in mpdecimate filter can automatically drop near-duplicate frames during extraction (redundant frames from pauses or very slow movement):
# Extract + auto-deduplicate ffmpeg -i input.mp4 \
-vf "fps=2,mpdecimate=hi=64*200:lo=64*50:frac=0.33" \
-vsync vfr \
-qscale:v 2 \
output/frame_%04d.jpg
Preserving EXIF Metadata
FFmpeg strips metadata by default. Add -map_metadata 0 to preserve source file global metadata:
ffmpeg -i input.mp4 \
-vf "fps=2" \
-qscale:v 2 \
-map_metadata 0 \
output/frame_%04d.jpg
Note: Video files have limited EXIF (usually only camera model and date). For precise focal length, record it in meta.yaml and batch-write with ExifTool:
# Batch write focal length (assuming 24mm lens) exiftool -FocalLength=24 -FocalLengthIn35mmFilm=24 ./output/*.jpgStep 2: Blur Detection & Removal
Motion blur is the #1 enemy of video frame extraction. Even 5–10 severely blurred frames among 300 good ones will cause visible blur artifacts at corresponding angles.
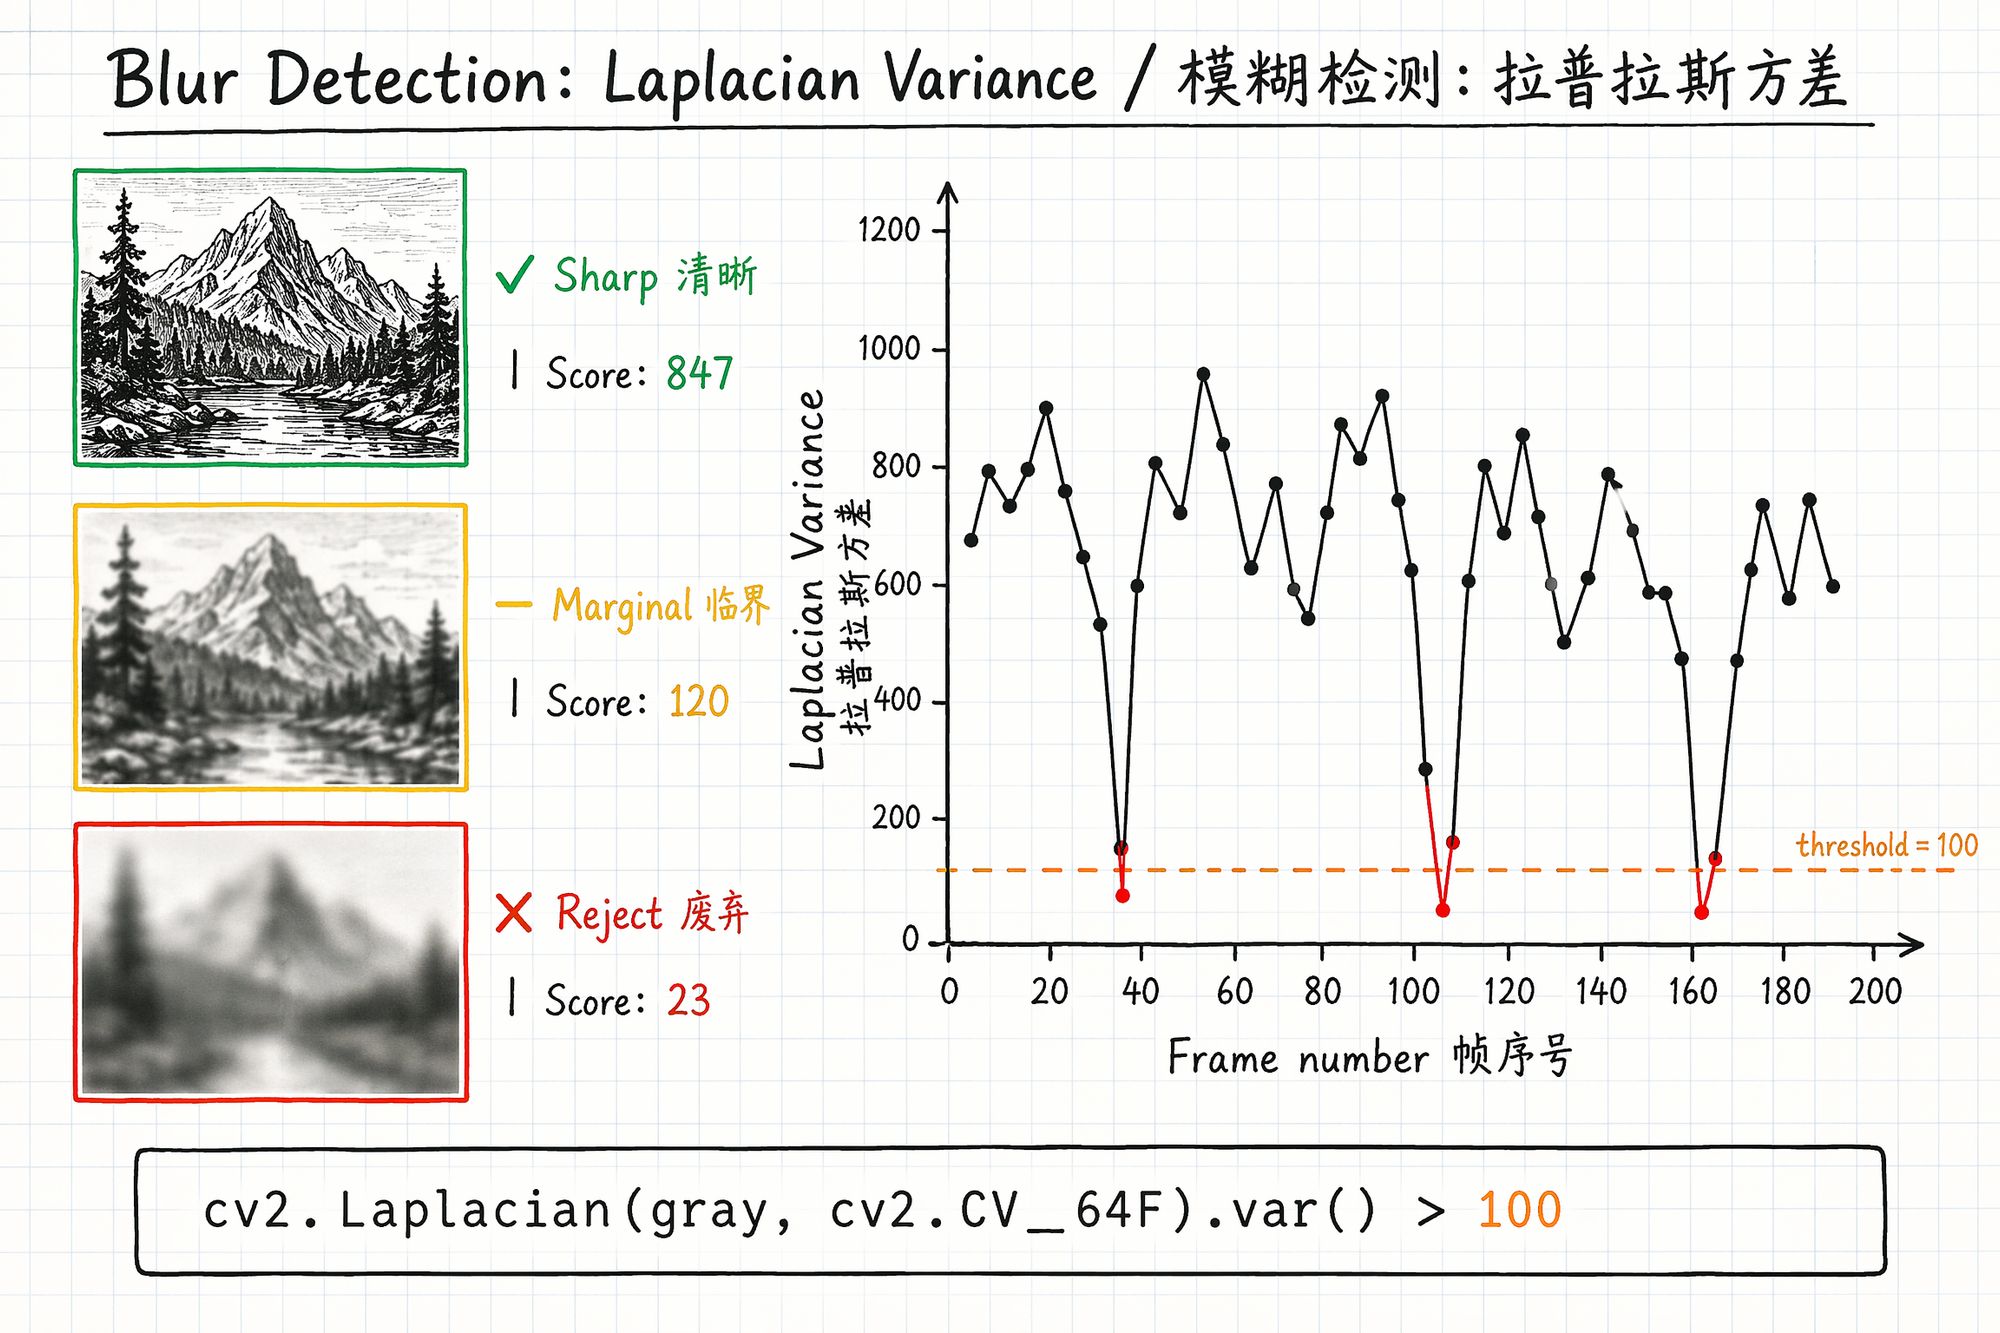
Laplacian Variance Method
Principle: Apply the Laplacian operator (second derivative) to the image and compute the variance of the result. Sharp images have many edges → high variance. Blurry images have few edges → low variance.
import cv2
def laplacian_variance(image_path):
"""Calculate sharpness score for a single image"""
img = cv2.imread(image_path)
gray = cv2.cvtColor(img, cv2.COLOR_BGR2GRAY)
return cv2.Laplacian(gray, cv2.CV_64F).var()
Threshold Selection
| Scene type | Recommended threshold | Notes |
|---|---|---|
| Texture-rich (bookshelves, gardens) | 100–150 | Sharp frames in normal scenes typically >200 |
| Medium texture (indoor, corridors) | 50–100 | Scenes with many white walls have lower overall scores |
| Sparse texture (white walls, sky) | 30–50 | Can't use high threshold or everything gets deleted |
Practical tip: Run once without a threshold, output all scores to CSV. Plot a histogram — find the clear "bimodal" distribution. Low peak = blurry frames, high peak = sharp frames. Set threshold at the valley between peaks.
File Size Quick-Screen Method
A faster rough filter: motion-blurred JPEG frames are typically 20–40% smaller than sharp frames (blur reduces detail → higher compression ratio).
# Sort by file size — smallest 20% are likely blurry ls -lS ./raw_frames/ \Step 3: Duplicate Frame Removal
When you pause during capture, hesitate while turning, or move very slowly, consecutive frames are nearly identical. These redundant frames provide no new information — they only slow COLMAP and waste training time.
SSIM (Structural Similarity) Deduplication
from skimage.metrics import structural_similarity as ssim import cv2
def is_duplicate(frame_a_path, frame_b_path, threshold=0.95):
"""Check if two frames are duplicates via SSIM"""
a = cv2.cvtColor(cv2.imread(frame_a_path), cv2.COLOR_BGR2GRAY)
b = cv2.cvtColor(cv2.imread(frame_b_path), cv2.COLOR_BGR2GRAY)
a = cv2.resize(a, (640, 480))
# Downscale for speed
b = cv2.resize(b, (640, 480))
return ssim(a, b) > threshold
SSIM Threshold Selection
| Threshold | Effect | Use case |
|---|---|---|
| 0.98 | Only removes near-static duplicates | Conservative, afraid of over-deletion |
| 0.95 | Balanced (recommended) | Most scenarios |
| 0.90 | Aggressive deduplication | Too many frames, need significant reduction |
| 0.85 | Very aggressive | Use with caution, may remove useful frames |
Step 4: Exposure Anomaly Detection
Overexposed (highlights blown white) and underexposed (shadows crushed black) frames must also be removed. They have few feature points and lost color information, causing color discontinuities at corresponding angles.
import cv2 import numpy as np
def check_exposure(image_path, low_thresh=30, high_thresh=225, max_ratio=0.25):
"""Detect over/underexposure. Returns: 'ok', 'overexposed', 'underexposed'"""
img = cv2.imread(image_path)
gray = cv2.cvtColor(img, cv2.COLOR_BGR2GRAY)
total = gray.size
over = np.sum(gray > high_thresh) / total
under = np.sum(gray < low_thresh) / total
if over > max_ratio:
return 'overexposed'
elif under > max_ratio:
return 'underexposed'
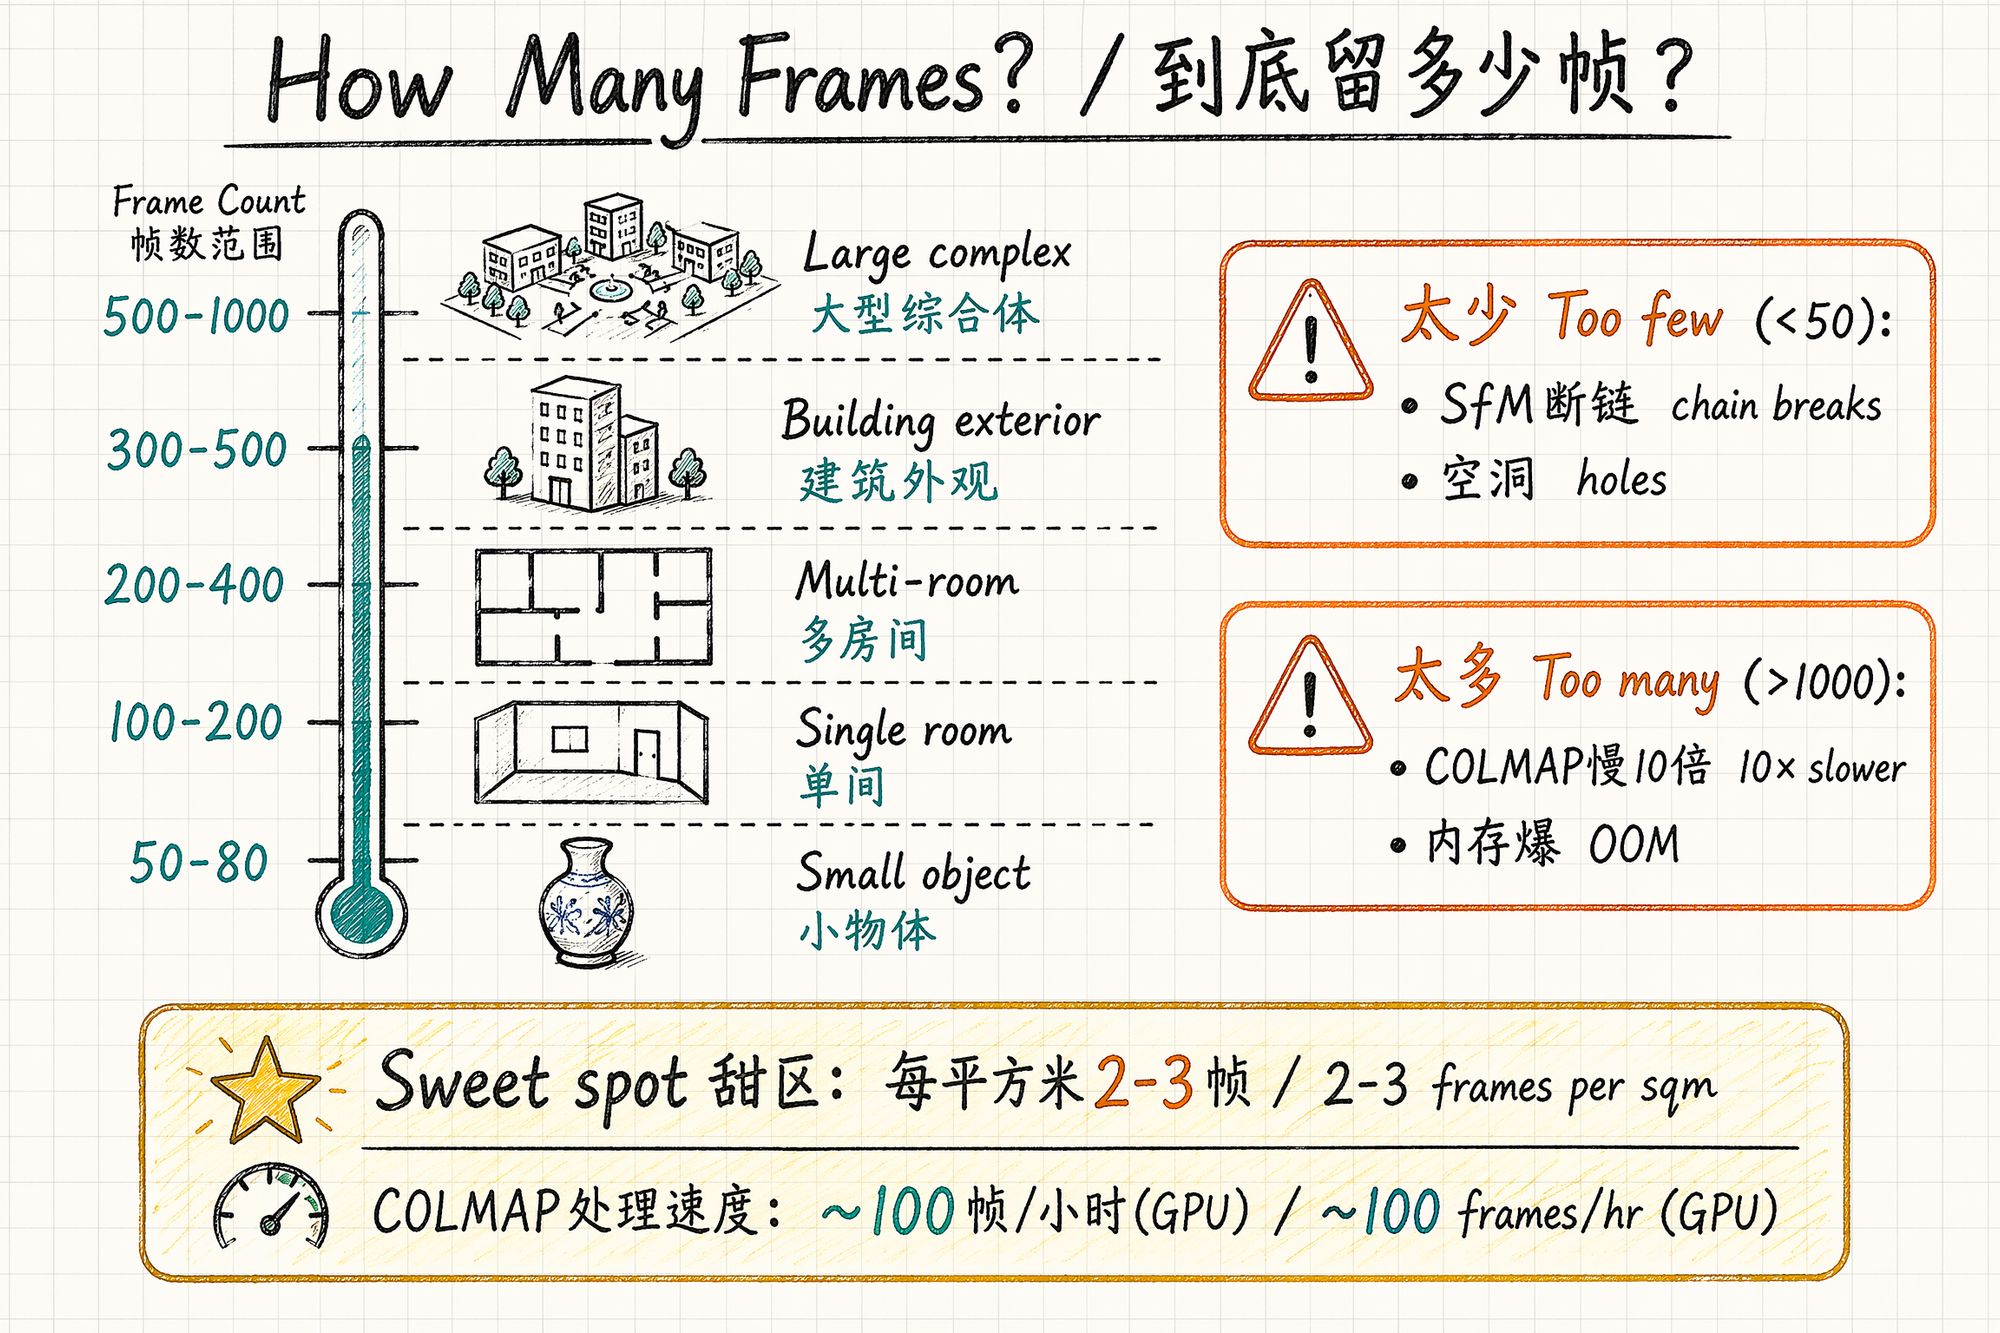
return 'ok'How Many Frames to Keep?
More isn't always better, and fewer isn't always worse. There's a sweet spot:
Recommended Frame Count by Subject Type
| Subject type | Recommended frames | Notes |
|---|---|---|
| Small object (<50cm) | 50–80 | Three-ring orbit sufficient |
| Medium object (50cm–2m) | 80–150 | Plus bottom fill shots |
| Single room (<30㎡) | 150–250 | Three layers × loop path |
| Multi-room (50–100㎡) | 250–400 | 80–120 frames per room |
| Building exterior | 300–500 | Ground + drone |
| Large complex | 500–1000+ | Grid segmentation, 150–200 per cell |
Problems with Too Many vs Too Few
| Issue | Too few (<50) | Too many (>1000) |
|---|---|---|
| COLMAP | Feature matching breaks, SfM fails | Runtime grows quadratically (N² complexity) |
| Memory | — | GPU VRAM insufficient, OOM crash |
| Training quality | Holes, blurry regions | Diminishing returns; redundant frames introduce noise |
| Time cost | — | COLMAP: 100 frames ~1h, 500 ~8h, 1000 ~30h+ |
COLMAP processing speed reference (RTX 4090):
• 100 frames: ~30 minutes
• 300 frames: ~2 hours
• 500 frames: ~6 hours
• 1000 frames: ~24 hours+
Frame count vs COLMAP time is approximately O(N²) because feature matching is pairwise.
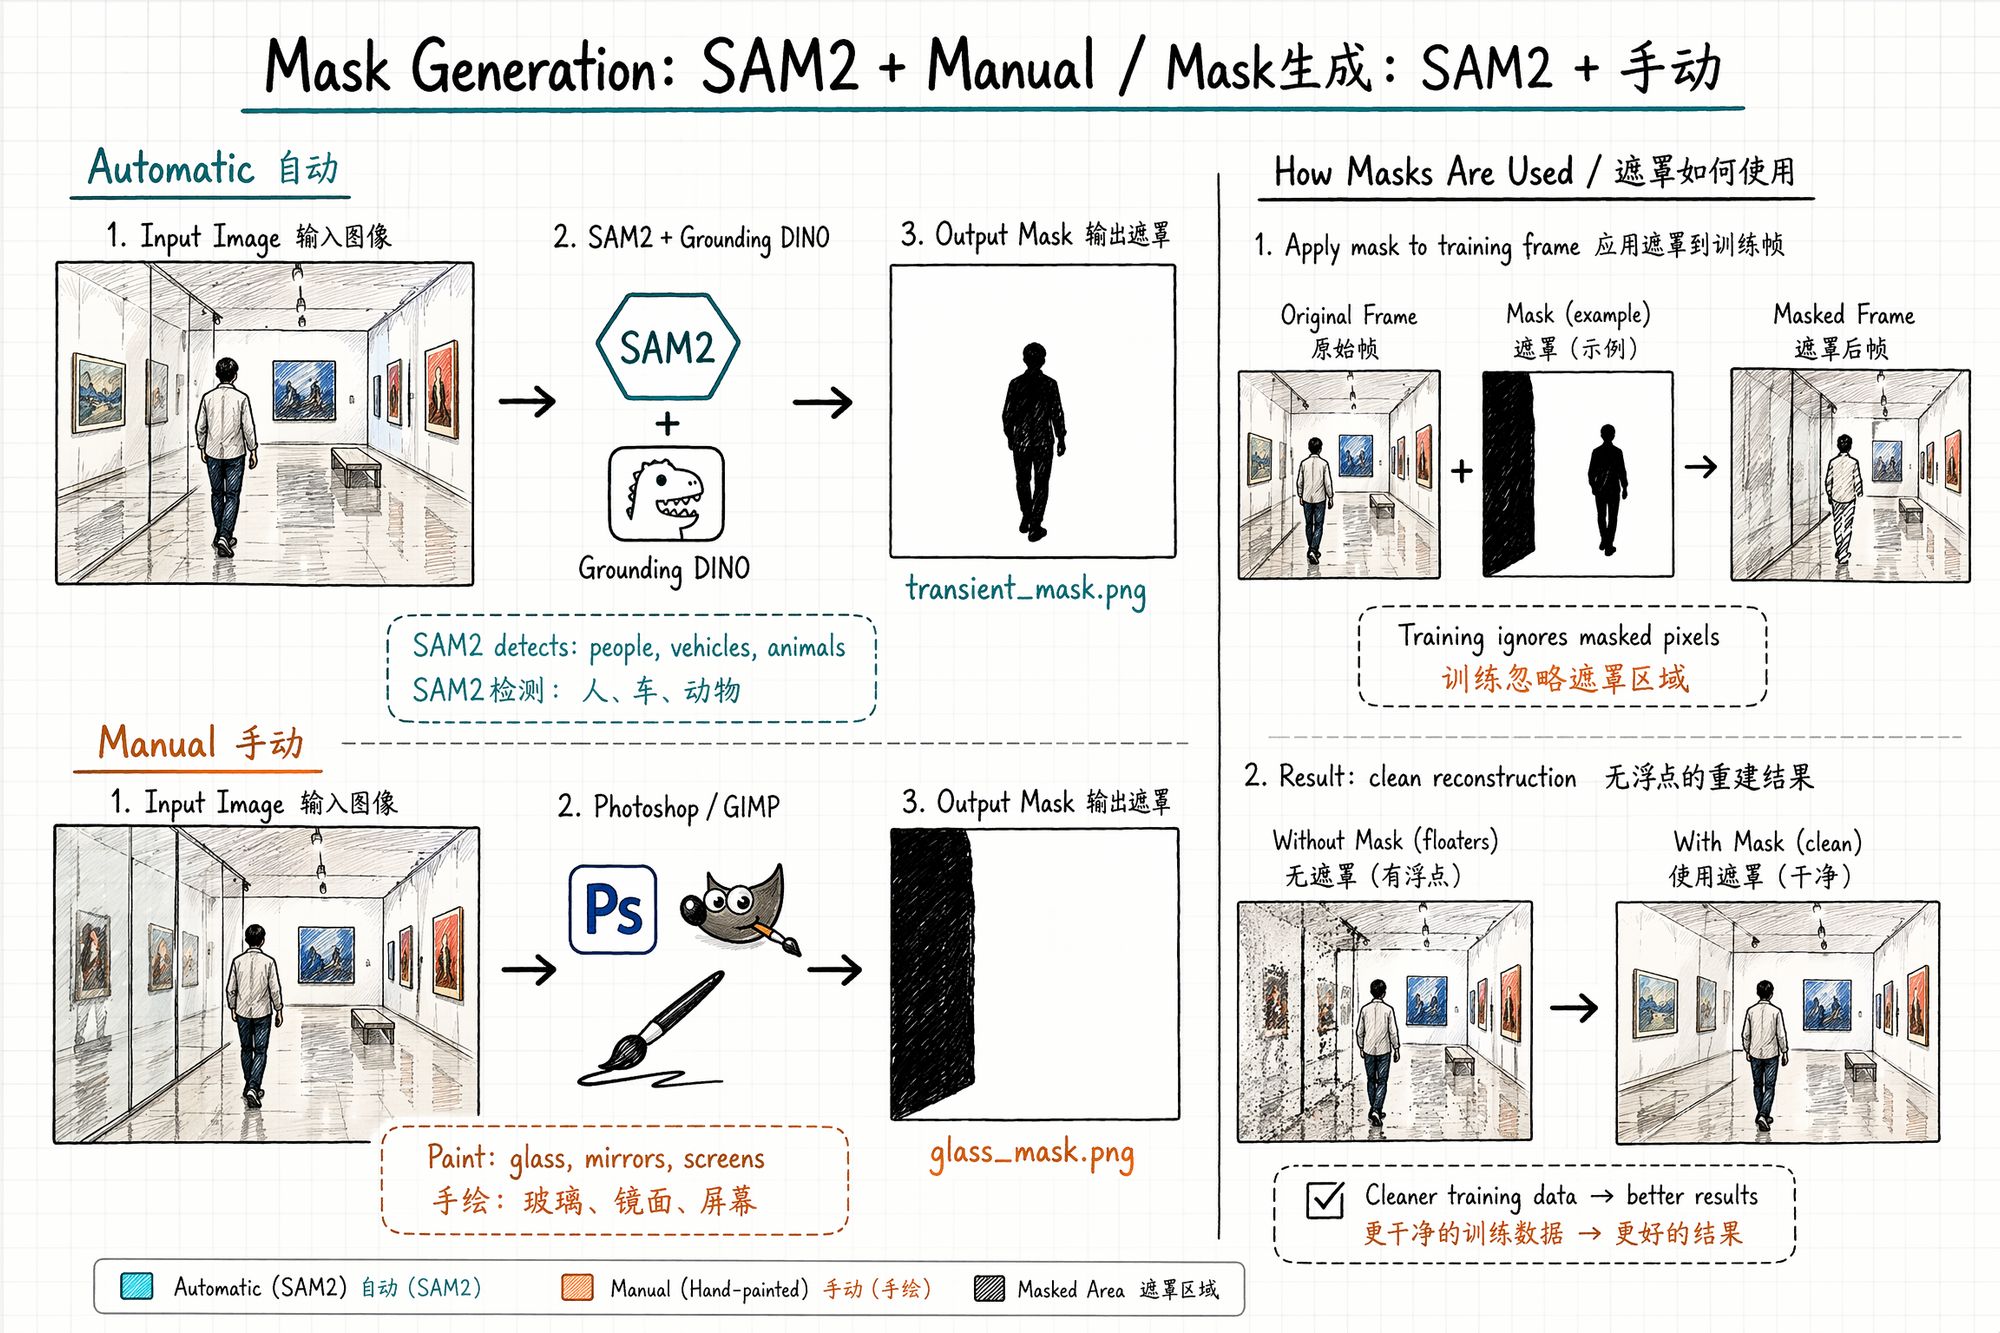
Mask Generation: Tell the Algorithm "Ignore This"
A mask is a black-and-white image the same size as the original: white area = train normally, black area = ignore during training. It solves the problem of scene elements you don't want the model to learn (pedestrians, vehicles, glass reflections, construction barriers).
When Masks Are Needed
| Scenario | Need mask? | Reason |
|---|---|---|
| Pedestrians passing | ✅ Strongly recommended | Different position across frames → floaters |
| Glass/mirrors | ✅ Recommended | Reflection content changes with viewing angle → artifacts |
| Screens/TVs | ✅ Recommended | Screen content differs every frame |
| Vehicles passing | ✅ Strongly recommended | Same as pedestrians |
| Wind-blown leaves | ⚠️ Optional | Slight motion may be tolerated; severe requires mask |
| Pure static scene | ❌ Not needed | No moving objects |
| Photographer's shadow | ✅ Recommended | Shadow position changes as you move |
Method 1: SAM2 / SAM3 Automatic Segmentation
Meta's SAM2 and SAM3 (released March 2026) can automatically detect and segment any object in images. Combined with Grounding DINO for text-guided detection, you can batch-generate masks for "person," "car," "animal."
from transformers import pipeline
# Initialize SAM3 pipeline generator = pipeline("mask-generation", model="facebook/sam3", device=0) outputs = generator(image_path, points_per_batch=64)
Method 2: Manual Painting (Photoshop / GIMP)
For cases automatic segmentation can't handle (glass reflections, specific light spots):
-
Open frame in Photoshop
-
New layer, paint black over areas to ignore
-
Export as matching _mask.png (pure black and white, no gradients)
-
Ensure mask dimensions exactly match the original frame
Batch tip: If glass/mirror positions are relatively fixed across frames (e.g., display cases), paint one mask template, then use SAM2's video propagation to automatically apply across all frames.
Mask File Naming Convention
01_selected/ ├── 001.jpg ├── 002.jpg └── ...
masks/ ├── 001_mask.png ├── 002_mask.png └── ...
Format requirements:
• PNG format (lossless, no compression artifacts)
• Pure black and white (0 or 255 only, no gray gradients)
• Dimensions exactly match corresponding frame
• Filenames correspond one-to-one with frames
Common Mistakes & Troubleshooting
| Mistake | Consequence | Solution |
|---|---|---|
| Extraction rate too high (10fps+) | Frame explosion, COLMAP can't handle it | Reduce to 2–3fps |
| Extraction rate too low (0.5fps) | Insufficient overlap, SfM chain breaks | Increase to 2fps or higher |
| Didn't filter blurry frames | Model shows blur artifacts at corresponding angles | Laplacian variance + threshold filter |
| Didn't remove duplicates | COLMAP 10× slower with no benefit | SSIM deduplication |
| Forgot to write EXIF focal length | COLMAP can't initialize intrinsics | ExifTool batch write |
| Mask size doesn't match original | Training error or mask misalignment | Ensure pixel-level alignment |
| Mask has gray gradients | Edge areas half-trained, produces artifacts | Binarize: only 0 and 255 |
| Extracted from HDR video | Color space mismatch, training produces color shift | Use SDR video only, or convert to SDR first |
Next Steps
• Frame selection complete, colors inconsistent → Enter 06-Color Grading & Consistency
• Want to train directly → Enter 08-Training
• Need to review asset organization → Back to 04-Asset Organization & Archival
• ← Previous chapter: 04-Asset Organization & Archival