stage 02
踩点与拍摄计划
Site Recon & Shot Planning
"Show Up and Shoot" = 40% Wasted Time
3DGS capture is not a walk-in job. Every minute on-site consumes your stable lighting window. If you arrive and only then start thinking "which direction do I walk," "which face do I shoot first," "how do I handle this glass" — you'll waste 40% of your effective time on hesitation. Light doesn't wait.
The purpose of scouting is singular: move all decisions to before capture day, so the shoot itself becomes pure execution.
Five Questions This Chapter Answers
-
What exactly should I observe and record during scouting?
-
What time of day offers the best light for my subject?
-
How do I plan a capture path that ensures coverage without backtracking?
-
If on-site conditions don't match expectations, what's Plan B?
-
What format should my shot plan take to enable zero-thinking execution?
Scouting Is Not "Having a Look" — You Must Bring Back 5 Things
Many people treat scouting like a stroll. They arrive, snap a few photos for social media, and come back remembering nothing. Effective scouting must produce these 5 pieces of information — missing any one means your shot plan is incomplete.

| # | Information to bring back | Recording method | Why it matters |
|---|---|---|---|
| 1 | Light schedule | Phone photos at 3 time points (arrival, +30min, +60min) | Determines shooting window on capture day |
| 2 | Obstacle map | Hand-drawn floor plan + annotated positions and sizes | Determines which angles to avoid or wait for clearance |
| 3 | Ground/path conditions | Text + photos (surface material, steps, slopes) | Determines tripod/handheld/drone/slider choice |
| 4 | Reflective/transparent surface list | Photos + annotations (glass, mirrors, metal, water) | Determines whether to bring CPL filter, whether post masks needed |
| 5 | Power/network/permits | Text notes | Determines battery strategy, file transfer plan, advance permissions |
Light: You Have One Window — Don't Waste It
3DGS requires consistent illumination throughout the entire capture session. You cannot "shoot half in the morning, half in the afternoon" — even on the same day, if the sun angle shifts 15°, shadow directions change, and training produces two worlds stitched together.
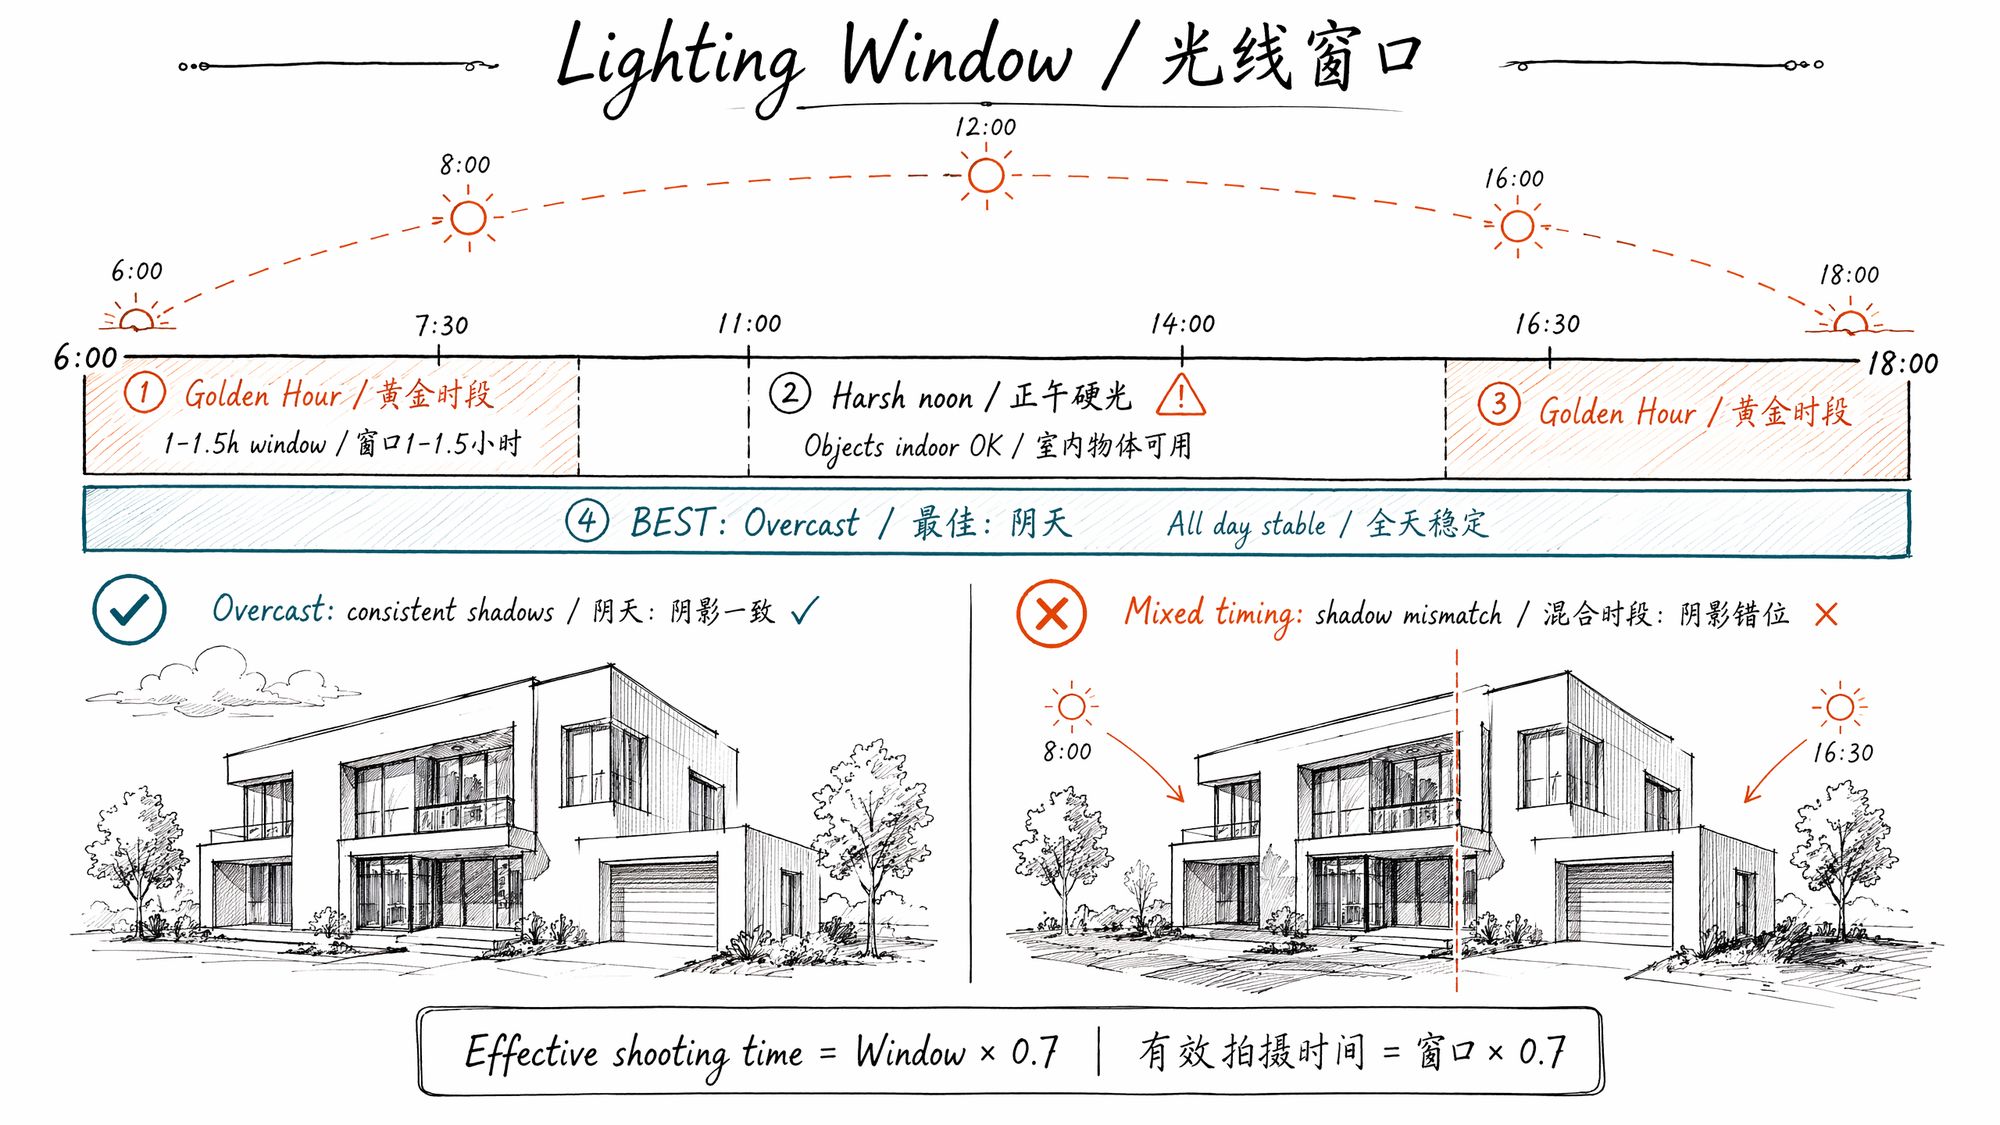
Four Lighting Conditions Ranked by Priority
| Lighting condition | Best for | Stable window | Risk |
|---|---|---|---|
| Overcast diffuse light | Everything (first choice) | All day, 6-8 hours | Color temp ~200K cool, one-click correction in post |
| Sunny morning/evening raking light | Building exteriors, scenes with shadow texture | 1-1.5 hours | Short window, color temp shifts ~100K every 10 min |
| Sunny noon overhead | Objects (indoor controlled light) | 2-3 hours | Outdoor: harsh shadows, contrast ratio >8:1 |
| Night/artificial light | Indoor galleries, commercial spaces | Unlimited (lights don't change) | Mixed color temp (3200K + 5600K), shadow noise at ISO >3200 |
How to Determine "How Long Is My Window"
Run this experiment during scouting:
-
Stand at a fixed angle facing the subject
-
Take one photo every 15 minutes from the same position
-
Continue for 1 hour (4 photos total)
-
Compare at home — the moment shadow position and length change by more than 10% marks your window boundary
Formula:
Effective shooting time = Window duration × 0.7Reserve 30% margin for contingencies (equipment issues, waiting for pedestrians, battery swaps).
Use Sun Surveyor to Pre-Predict Lighting
You don't need to visit the site every time to test light. Sun Surveyor (iOS/Android, $10 one-time) predicts sun trajectory and shadow direction for any location on any date:
Workflow:
-
Open Sun Surveyor → Map View
-
Pin your capture location on the map
-
Drag the time slider, observe sun azimuth and shadow length changes
-
Find the period with shortest/most stable shadows → this is your shooting window
-
Switch to AR View → overlay sun trajectory on your phone camera in real-time
Free alternatives: Sun Seeker (iOS $10), PhotoTime (free, fewer features), SolarApp (free, shadow simulation)
Path Planning: Coverage vs Efficiency
The core tension in capture path planning: you need to cover all angles, but cannot backtrack (backtracking = light has changed = inconsistency between earlier and later shots).
Scene Paths: One-Way Loop
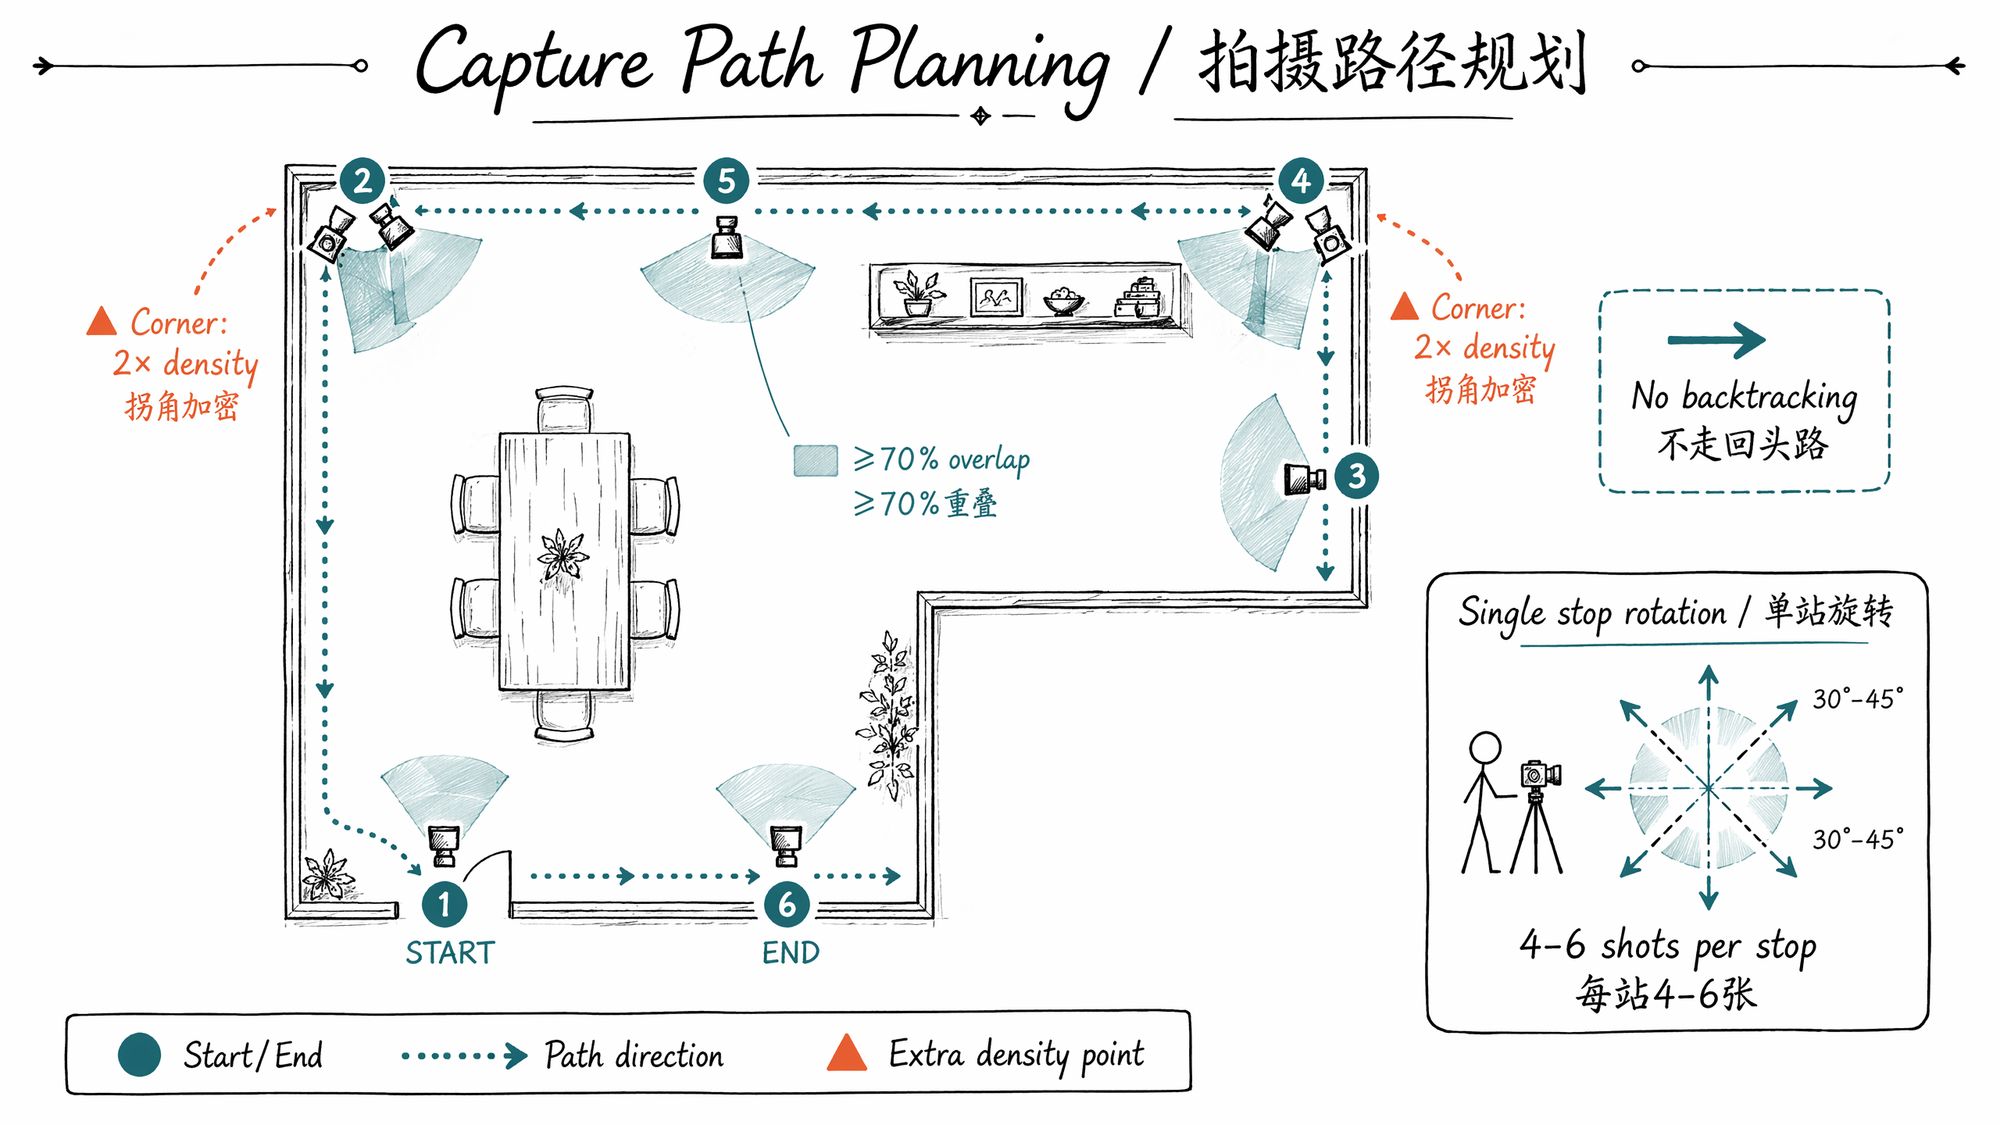
Principle: Start at the entrance, walk along walls in one direction, form a closed loop. No backtracking.
| Step | Action | Key parameter |
|---|---|---|
| 1 | Choose start point (usually entrance) | Mark on floor plan |
| 2 | Walk along walls, facing the opposite wall | Stop every 1-2m |
| 3 | Take 4-6 shots at different orientations per stop | Rotate 30-45° each time |
| 4 | Slow down at corners, increase density | 3-5 extra shots before and after each corner |
| 5 | Return to near start point, close the loop | Start/end overlap ≥5 shots |
| 6 | Center fill (if large central object exists) | Extra 10-20 shots |
Critical at corners: Corners are where SfM is most likely to break. Start increasing density 1m before the corner, continue 1m after. Each corner needs ≥8 photos to ensure ≥30% co-visibility between the two corridor segments.
Object Paths: Three-Ring Orbit
Principle: Object stays still, you orbit it three times (top/middle/bottom), each ring at a different height.
| Ring | Camera height | Angular interval | Count |
|---|---|---|---|
| Ring 1 (horizontal) | Level with object center | Every 10° | 36 shots |
| Ring 2 (overhead) | 30-45° above object | Every 15° | 24 shots |
| Ring 3 (looking up) | 20-30° below object | Every 15° | 24 shots |
| Bottom fill | Directly overhead | — | 5-8 shots |
Continuity between rings: When transitioning from Ring 1 to Ring 2, don't suddenly jump to the new height. Over 5-6 transitional shots, gradually raise the camera to maintain ≥80% frame overlap between adjacent shots. Sudden jumps = SfM chain break.
Building Exterior Paths: Ground Loop + Drone Top Fill
Principle: Ground-level orbit for facades, drone fills rooftop and 45° oblique angles.
| Phase | Tool | Coverage area | Count |
|---|---|---|---|
| Ground orbit | DSLR + 24-35mm | Ground to 2nd floor height | 80-150 shots |
| Telephoto fill | DSLR + 70-200mm | Upper details (eaves, ornaments) | 20-40 shots |
| Drone nadir | DJI Mini 4 Pro / Matrice 4E | Rooftop overhead | 30-80 shots |
| Drone oblique | Same, 45° tilt | Upper facade | 50-100 shots |
Plan B When On-Site Conditions Don't Match
Scouting showed perfect conditions, but capture day might bring weather changes, construction, or crowds. Prepare Plan B in advance:
| Contingency | Plan B |
|---|---|
| Overcast during scout, sunny on capture day | Reschedule to before 7:00 AM (short shadows) or wait for next overcast day |
| Continuous pedestrian/vehicle traffic | Wait for 30-second gaps, burst 10 shots → move → wait again. Or reschedule to 6:00 AM |
| Construction blocking one face | Record blocked area, capture everything else. Crop blocked region in SuperSplat later |
| Indoor lights turned off/changed | Bring 2× LED panel lights (5600K, CRI ≥95), lock color temperature |
| Rain | Cancel outdoor. Indoor continues if lighting unchanged |
| Battery running low | Check battery every 100 shots. Bring ≥3 spare batteries (DSLR) or power bank (phone) |
Shot Plan Template: One Page, Zero-Thinking Execution
The shot plan must fit on one page. Print it on capture day, bring it to the site, follow it step by step.
Template Format
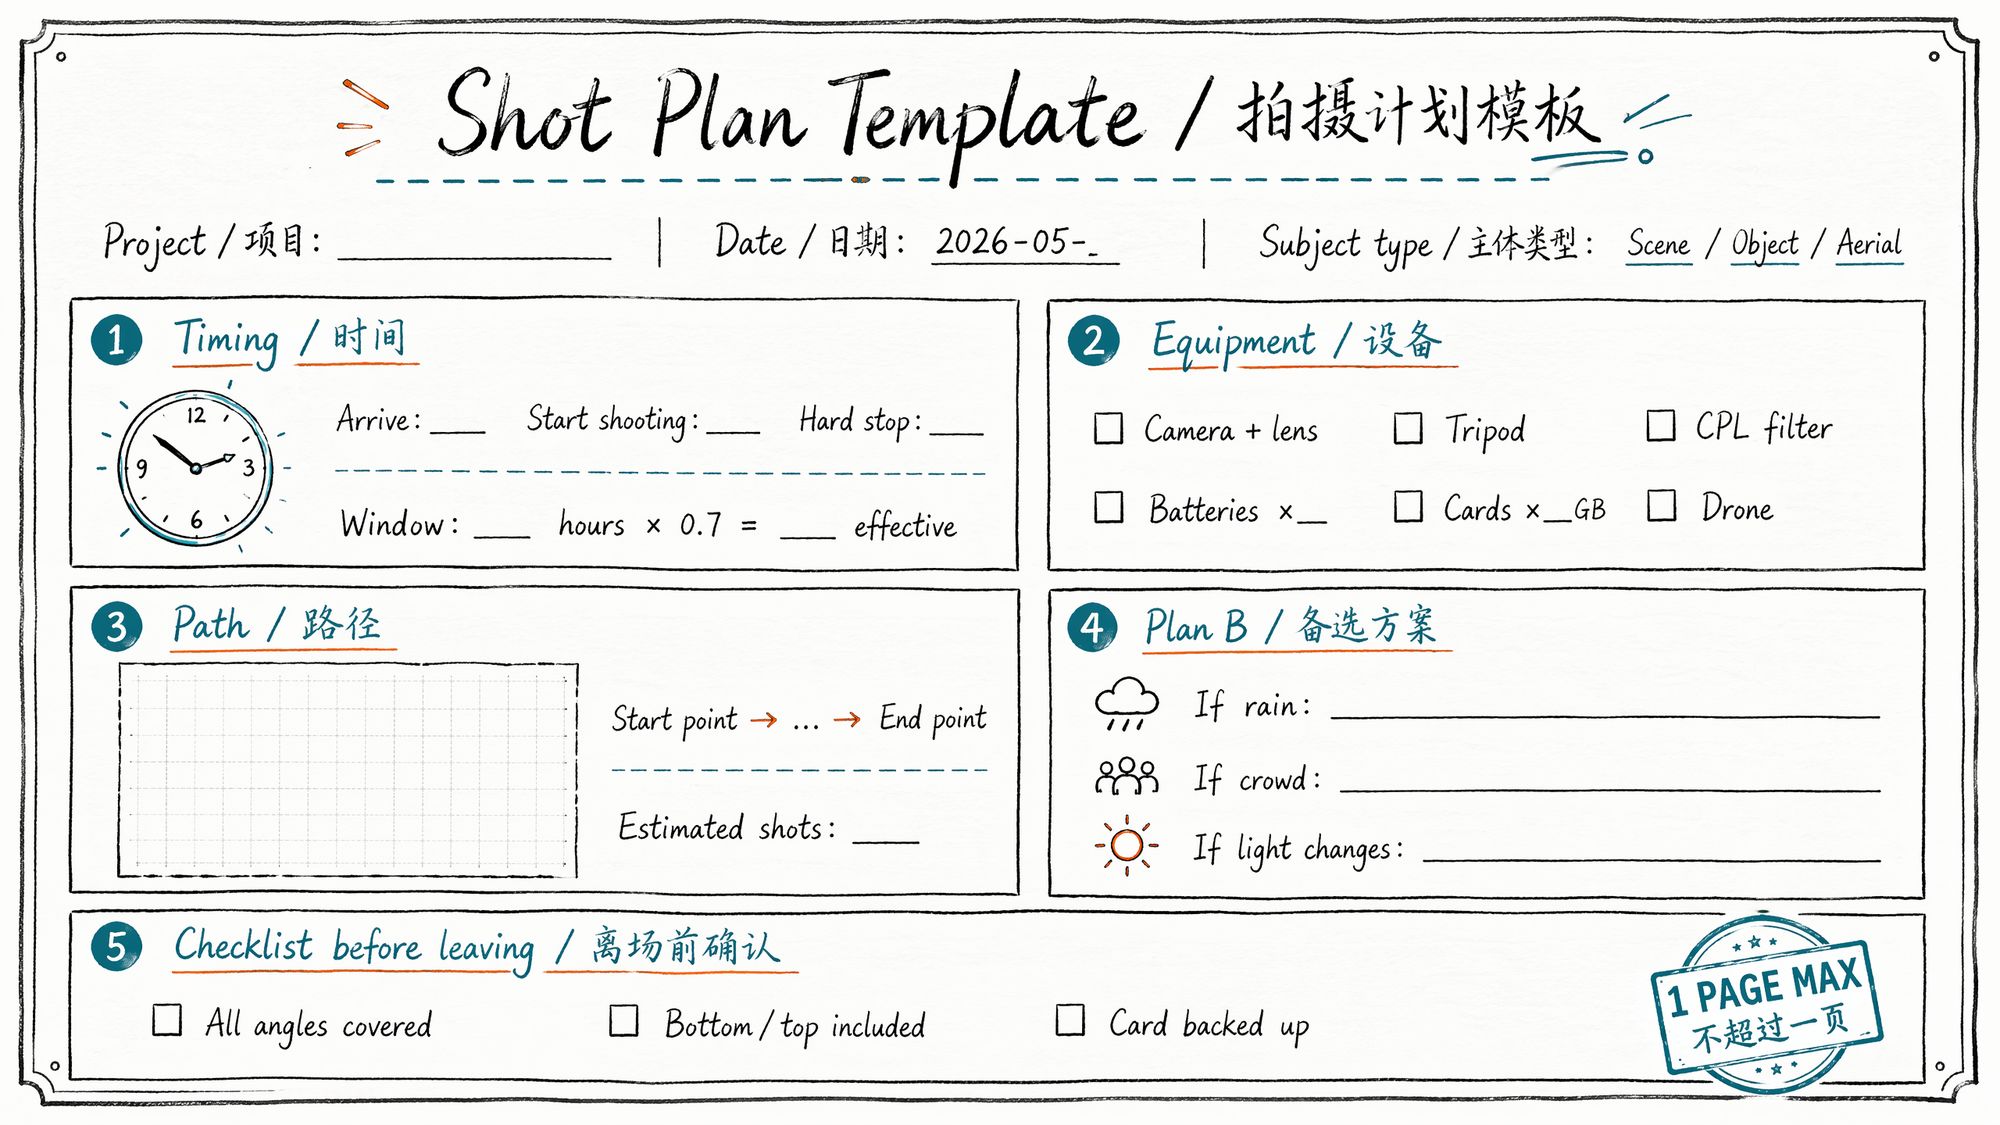
# Timing arrive: "08:30" start_shooting: "09:00" hard_stop: "11:30"
# Window boundary window_hours: 2.5 effective_time: "2.5 × 0.7 = 1.75 hours"
# Equipment camera: "Sony A7M4 + FE 24mm f/1.4 GM" backup_lens: "FE 35mm f/1.8" accessories:
- CPL polarizing filter (for display case glass)
- Tripod (for dark corner fill shots)
- SD card 128GB × 2
- Batteries × 3 (each ~500 shots)
- LED panel light × 1 (backup fill)
# Path start_point: "Main entrance, left side" direction: "Counter-clockwise" estimated_shots: 180 key_nodes:
- "Entry hall: 20 shots (include ceiling looking up)"
- "Gallery A: 40 shots (watch display case glass, CPL on)"
- "Corridor transition: 15 shots (increase density, ensure connection)"
- "Gallery B: 50 shots (large sculpture: separate orbit 30 shots)"
- "Back hall: 30 shots"
- "Return to entrance: 15 shots (loop closure overlap)"
# Floor Plan # [Attach hand-drawn floor plan photo]
# Plan B rain: "Indoor — unaffected, continue" crowd: "Wait for 30-second gaps, or fill shots after 11:30 when fewer people" light_change: "Close all curtains, switch to pure artificial light mode"
# Exit Checklist checklist:
- "□ All wall surfaces covered"
- "□ Ceiling/floor ≥10 shots each"
- "□ Display case glass areas shot with CPL"
- "□ Corner transitions density increased"
- "□ SD card backed up to phone/laptop"
- "□ Total count ≥ 80% of estimate"
Polycam / Scaniverse Quick Scouting Technique
If you're using a phone cloud workflow (Polycam / Scaniverse), scouting can be lighter:
-
On arrival, do a quick scan with Scaniverse (Gaussian Splat mode, 60-second scan → 5-minute processing)
-
Review the result: Where are the holes? Where are the floaters? Where is it blurry?
-
These problem areas are exactly where you need increased density during the real capture
-
Annotate problem areas on your floor plan → scouting complete
The benefit: in 10 minutes you get a "preview version" showing exactly where problems will occur. Targeted density during the real capture is 3× more efficient than blind shooting.
Next Steps
• Scouting complete, ready for capture → Enter 03-Camera Parameters & Field Operations
• Want to review subject classification first → Back to 01-Subject Classification & Capture Strategy
• Going straight to cloud workflow → Enter 08-Training