stage 03
相机参数与现场操作
Camera Settings & On-Site Operation
The 5 Iron Rules (Universal)
Regardless of device, these 5 rules are non-negotiable. Burn them into muscle memory before worrying about device-specific differences.
| # | Rule | Why |
|---|---|---|
| 1 | M mode locks everything (aperture / shutter / ISO / WB / focal length / focus) | The algorithm assumes "the same point has consistent color from different angles." Any auto-varying parameter breaks this assumption. |
| 2 | One lens for the entire session, no zooming | Zooming changes focal length = changes the intrinsic matrix. SfM will collapse. |
| 3 | HDR always on | 3DGS suffers from detail loss in blown highlights / crushed shadows. HDR recovers both. |
| 4 | Adjacent frame overlap ≥ 50% (70% recommended) | SfM relies on feature point matching between adjacent frames to locate camera positions. Insufficient overlap = position unsolvable. |
| 5 | Translate the camera, don't rotate in place | Rotation produces no parallax, zero geometric information. The algorithm cannot find a triangulation baseline. |
Lighting Condition Priority
3DGS loves uniform diffuse light — its worst enemy is "the specular highlight moved between angles." Inconsistent lighting directly causes color discontinuities across viewing angles in the trained model.

| Lighting condition | Rating | Reason |
|---|---|---|
| Overcast / cloudy | ★★★★★ | Most uniform diffuse light, no harsh directional light, virtually no shadow artifacts |
| Sunny · 2 hours after sunrise | ★★★★ | Soft light, stable color temp ~5200K, but avoid noon |
| Sunny · noon | ★★ | Overhead light creates harsh shadows, subject contrast >8:1, color distortion likely |
| Indoor · natural light | ★★★ | Turn off TV screens, spinning chandeliers — keep light stable |
| Indoor · 3-point softbox | ★★★★★ | Fully controllable, studio first choice. Unified 5600K, CRI ≥95 |
| Rain / fog | ★ | Lens gets wet, atmospheric scattering too strong, geometric information lost |
Rule of thumb: Overcast skies are God's gift to 3DGS shooters. If you can choose the date, always choose overcast.
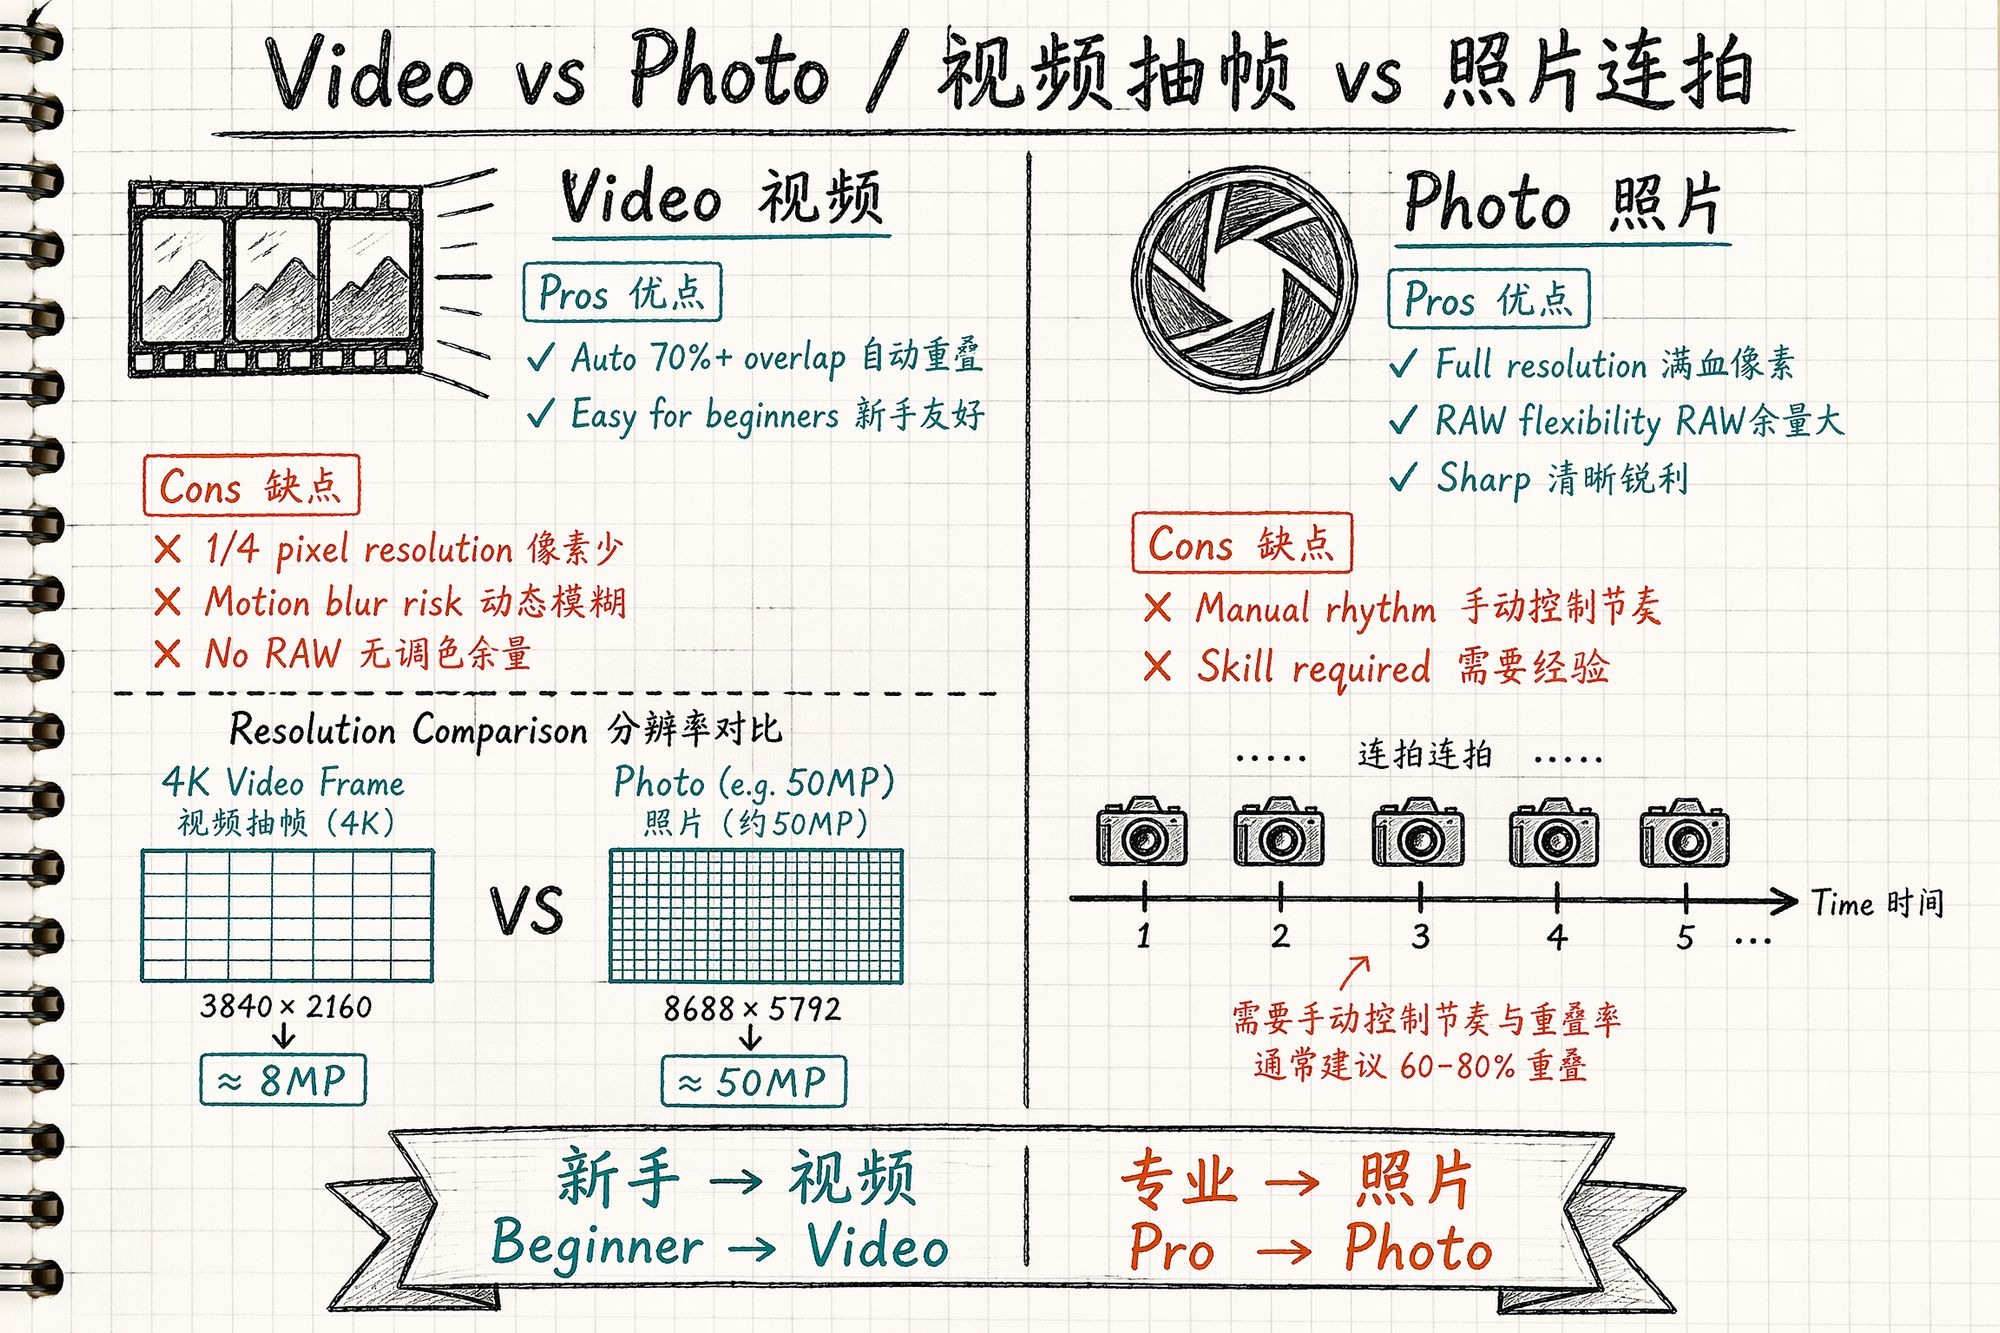
Video Frame Extraction vs Photo Burst
The industry is split on this. Our judgment: beginners use video, professionals use photos.
| Dimension | Video extraction (60fps+) | Photo burst |
|---|---|---|
| Overlap | Automatic 70%+, no thinking required | Manual rhythm control needed |
| Per-frame resolution | Same CMOS: video is ~1/4 pixels of photo (4K=8MP vs photo 50MP) | Full sensor resolution |
| Motion blur | Likely (movement + lower shutter speed) | Minimal (high shutter ≥1/125s) |
| Post color grading headroom | Almost none (H.264/H.265 compression) | RAW gives 14-bit latitude |
| Best for | Beginners, mobile devices, speed | Experienced shooters, quality |
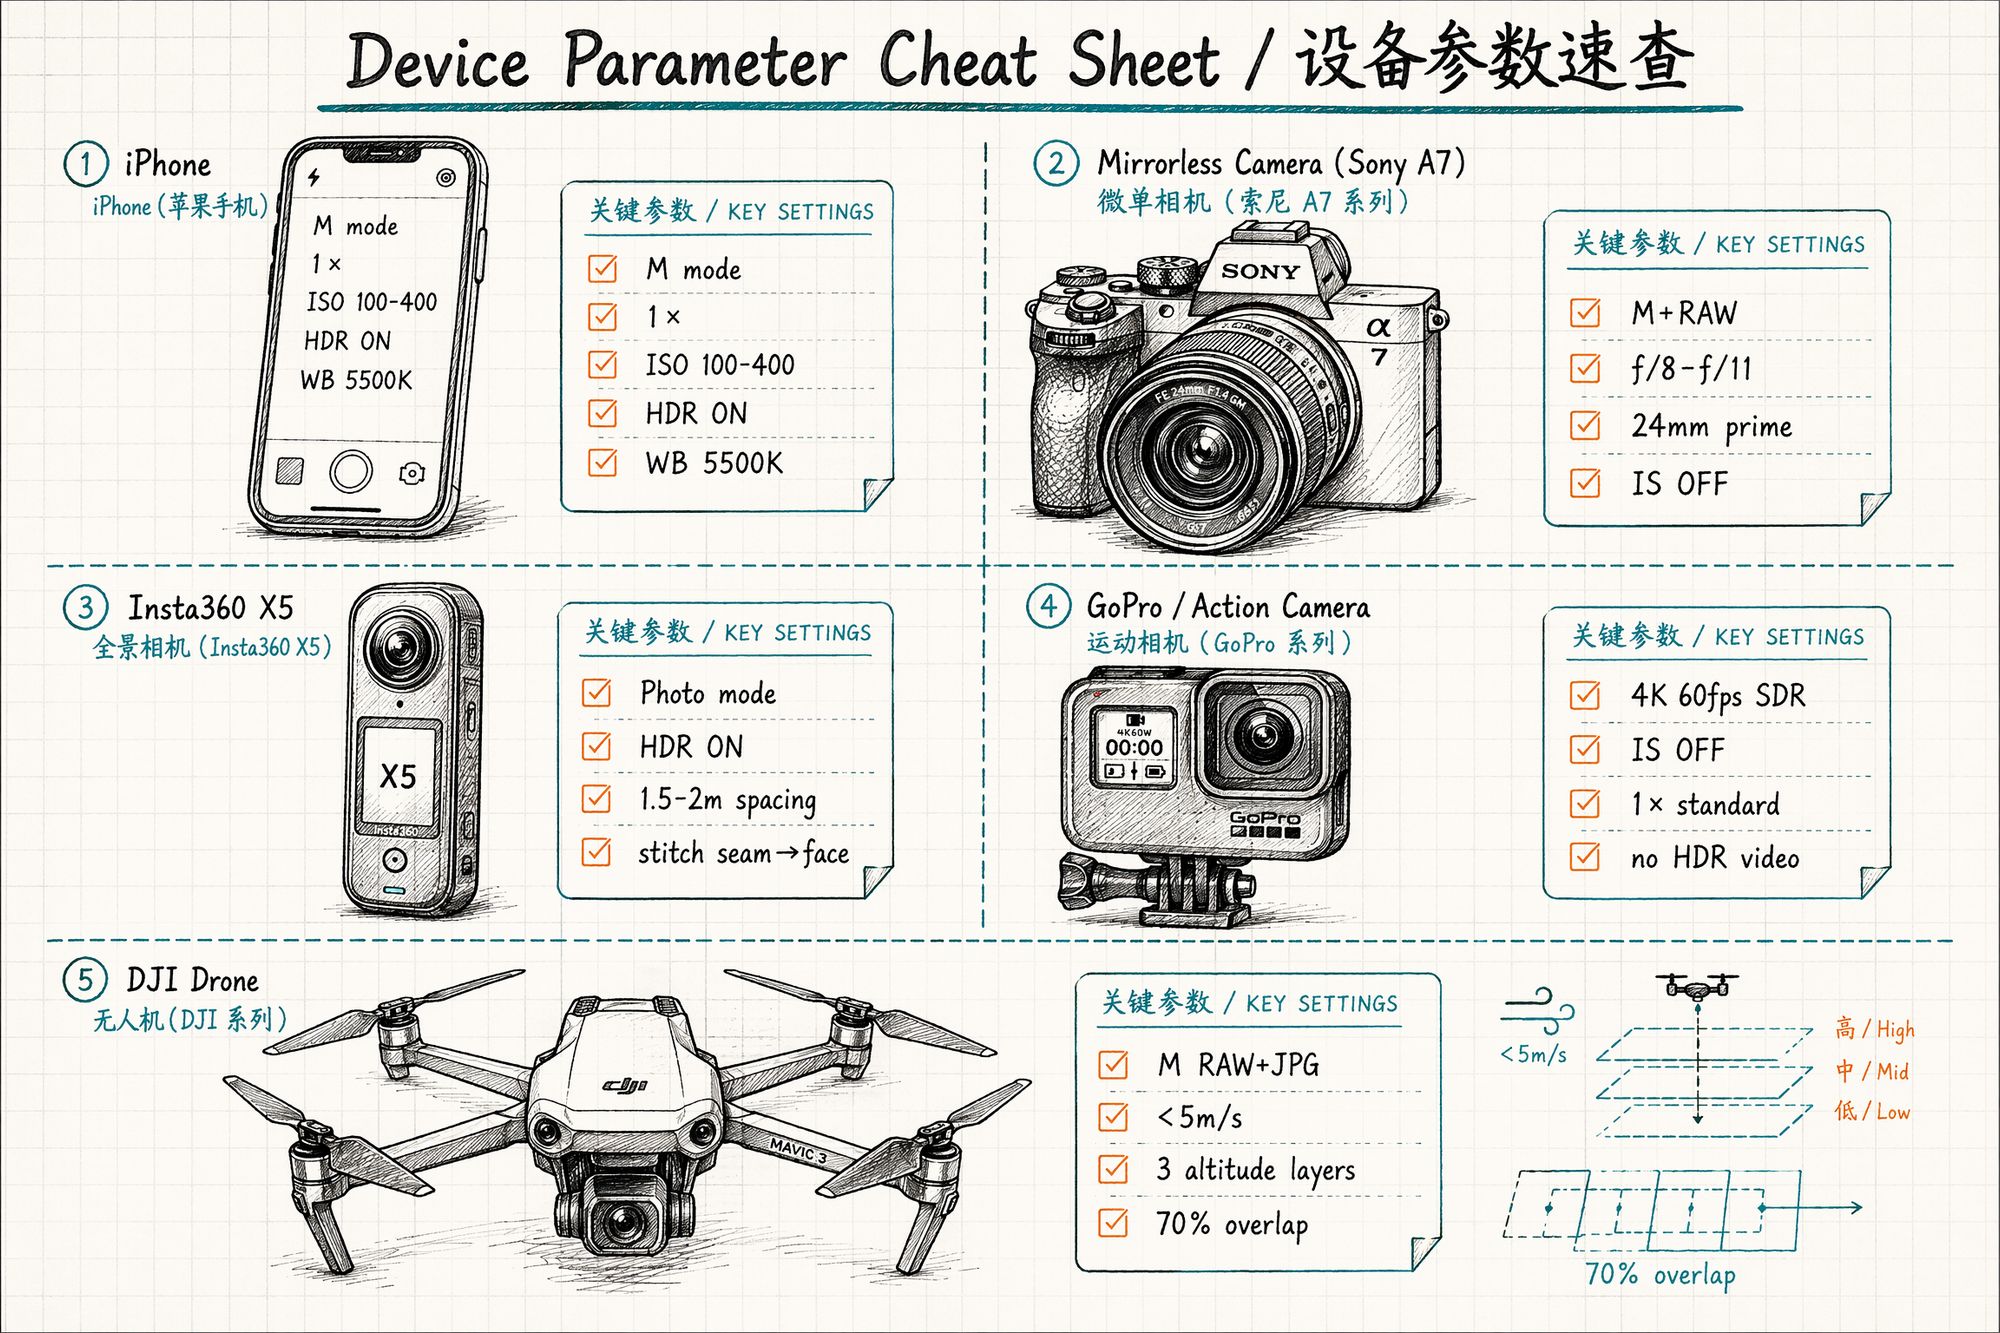
Device-Specific Parameters
Below is an excerpt from our studio's capture manual, providing "power-on-and-go" parameter presets by device.
Phone (iPhone / Android Flagship)
| Setting | Value | Notes |
|---|---|---|
| Mode | M / Pro mode | iPhone's native camera won't work — use Halide / ProCamera |
| Lens | 1× main | 0.5× ultrawide only for small-space rescue |
| Resolution | 4032×3024 (4:3) | Don't use 16:9 — loses ~25% vertical information |
| ISO | 100–400 | Don't exceed 800 in low light (noise destroys feature matching) |
| Shutter | ≥1/60s (handheld) / 1/30s (tripod) | Prevent motion blur |
| HDR | Always on | iPhone default on; Android needs manual enable |
| Focus | Lock (tap AE/AF Lock) | Critical |
| White balance | Manual 5500K | Never Auto — Auto jumps between angles |
iPhone note: The system camera's "Auto HDR" actually varies exposure strategy per frame, causing brightness inconsistency between adjacent frames. Use Halide's Manual HDR mode, or disable system HDR entirely and use fixed exposure.
Mirrorless / DSLR
| Setting | Value | Notes |
|---|---|---|
| Mode | M + RAW | RAW provides 14-bit post-processing latitude |
| Lens | 24mm / 35mm prime | Zoom lens acceptable but tape the zoom ring locked |
| Aperture | f/8–f/11 | Deep enough DoF (~0.8m at 1m subject distance), minimal distortion |
| ISO | 100–400 | Tripod allows locking ISO 100 |
| Shutter | ≥1/125s (handheld) / 1/30s (tripod) | Slower requires stabilizer |
| White balance | Manual 5500K or custom gray card calibration | Never Auto |
| Focus | MF + single-point lock | Keeps focal plane consistent across all shots |
| Image stabilization | OFF | IS causes ±0.5px unpredictable shifts between frames; SfM misinterprets these |
Why turn off stabilization? In-body stabilization (IBIS) compensates shake by physically moving the sensor — meaning each frame's sensor position differs slightly. SfM assumes the sensor is fixed on the lens optical axis. IS breaks this assumption. On a tripod, it's even worse: the IS system "can't find shake" and creates micro-vibrations of its own.
360° Camera (Insta360 X5 / Theta Z1)
360° cameras are efficiency powerhouses for large spaces. In April 2026, Insta360 partnered with Splatica to offer automated 360° video → 3DGS pipelines: 5-minute capture → model ready in hours.
| Setting | Value | Notes |
|---|---|---|
| Mode | Photo priority, video secondary | Same CMOS: video is 1/4 pixels of photo |
| Format | JPEG + DNG (if supported) | DNG for post-processing headroom |
| HDR | Always on | 360° cameras have tight exposure latitude (~11 stops per eye) |
| White balance | Manual 3200K (warm indoor) / 5500K (outdoor) | Auto causes color shifts at stitch seams |
| ISO | 100–400 | Don't exceed 800; X5's 1/1.3" sensor shows visible noise above ISO 800 |
| Spacing | Horizontal 1.5–2m, vertical 3 layers | Waist / chest / head height |
| Subject distance | ≥1.2m safe distance | Too close triggers fisheye distortion artifacts |
| Self-occlusion | Stitch seam aimed at your face | Lets algorithm ignore you |
Critical workflow: .insv → JPEG export
Never feed raw .insv files directly to training software. Export through Insta360 Studio first:
-
Open Insta360 Studio → select .insv files
-
Export settings: maximum resolution (X5 reaches 8192×4096)
-
Disable FlowState stabilization (stabilization alters inter-frame geometry)
-
Enable Direction Lock
-
Enable PureShot / Clarity Enhancement
-
Export as JPEG (or DNG for color grading)
Training failure rate with raw .insv exceeds 80%. After export, use a CubeMap split script to cut into 6 faces, then feed to COLMAP.
Action Camera (GoPro Hero 13 / Insta360 Ace Pro 2 / DJI Action 5)
Action cameras are the best value for outdoor work. The triple-mount rig — three cameras on one pole, voice-synced trigger — captures museums and galleries an order of magnitude faster.
| Setting | Value | Notes |
|---|---|---|
| Mode | 4K 60fps SDR | Don't shoot HDR video (HLG/Dolby Vision color pipeline is complex, training software incompatible) |
| Lens | 1× standard wide | 0.5× fisheye distortion too heavy for COLMAP correction |
| Stabilization | OFF | Same reason — stabilization makes inter-frame displacement uncontrollable |
| Speed | Normal speed recording | Extract every Nth frame with FFmpeg in post |
| White balance | Manual lock (outdoor 5500K / indoor 4000K) | Action camera Auto WB jumps severely |
| Low light | Switch to photo mode | Video in low light drops shutter to 1/30s → severe motion blur |
Triple-mount details: A 2m carbon fiber pole with GoPros at top, middle, and bottom. Use GoPro Labs firmware "voice trigger" for synchronized start. Three cameras recording simultaneously = continuous three-height coverage in a single pass.
Drone (DJI Mini 4 Pro / Mavic 3 Pro / Matrice 4E)
| Setting | Value | Notes |
|---|---|---|
| Mode | M RAW + JPG | JPG feeds SfM directly; RAW for post backup |
| Lens | Main 1× | Don't use telephoto (shallow DoF, narrow FoV, low coverage efficiency) |
| Flight mode | Smart Orbit / Litchi waypoint planning | Avoid hand-flying jitter; Litchi enables precise flight paths |
| Speed | Slow and constant <5m/s | Prevent motion blur (5m/s + 1/500s shutter = 1cm displacement/frame) |
| Altitude | Three layers (look up 30° / level 0° / look down -45°) | Single layer cannot reconstruct the top |
| Overlap | Forward 80%, lateral 70% | Set in DJI Terra / Litchi flight planning |
| Time | Overcast / 2 hours after sunrise | Avoid noon overhead light |
| Distance | ≥30m from subject | Too close = heavy distortion + safety risk |
DJI Terra V5.2 workflow: Since July 2025, DJI Terra natively supports 3DGS output. Flight planning → autonomous flight → photo transfer → one-click .ply generation. For building exterior projects, this is currently the most hands-off end-to-end solution.
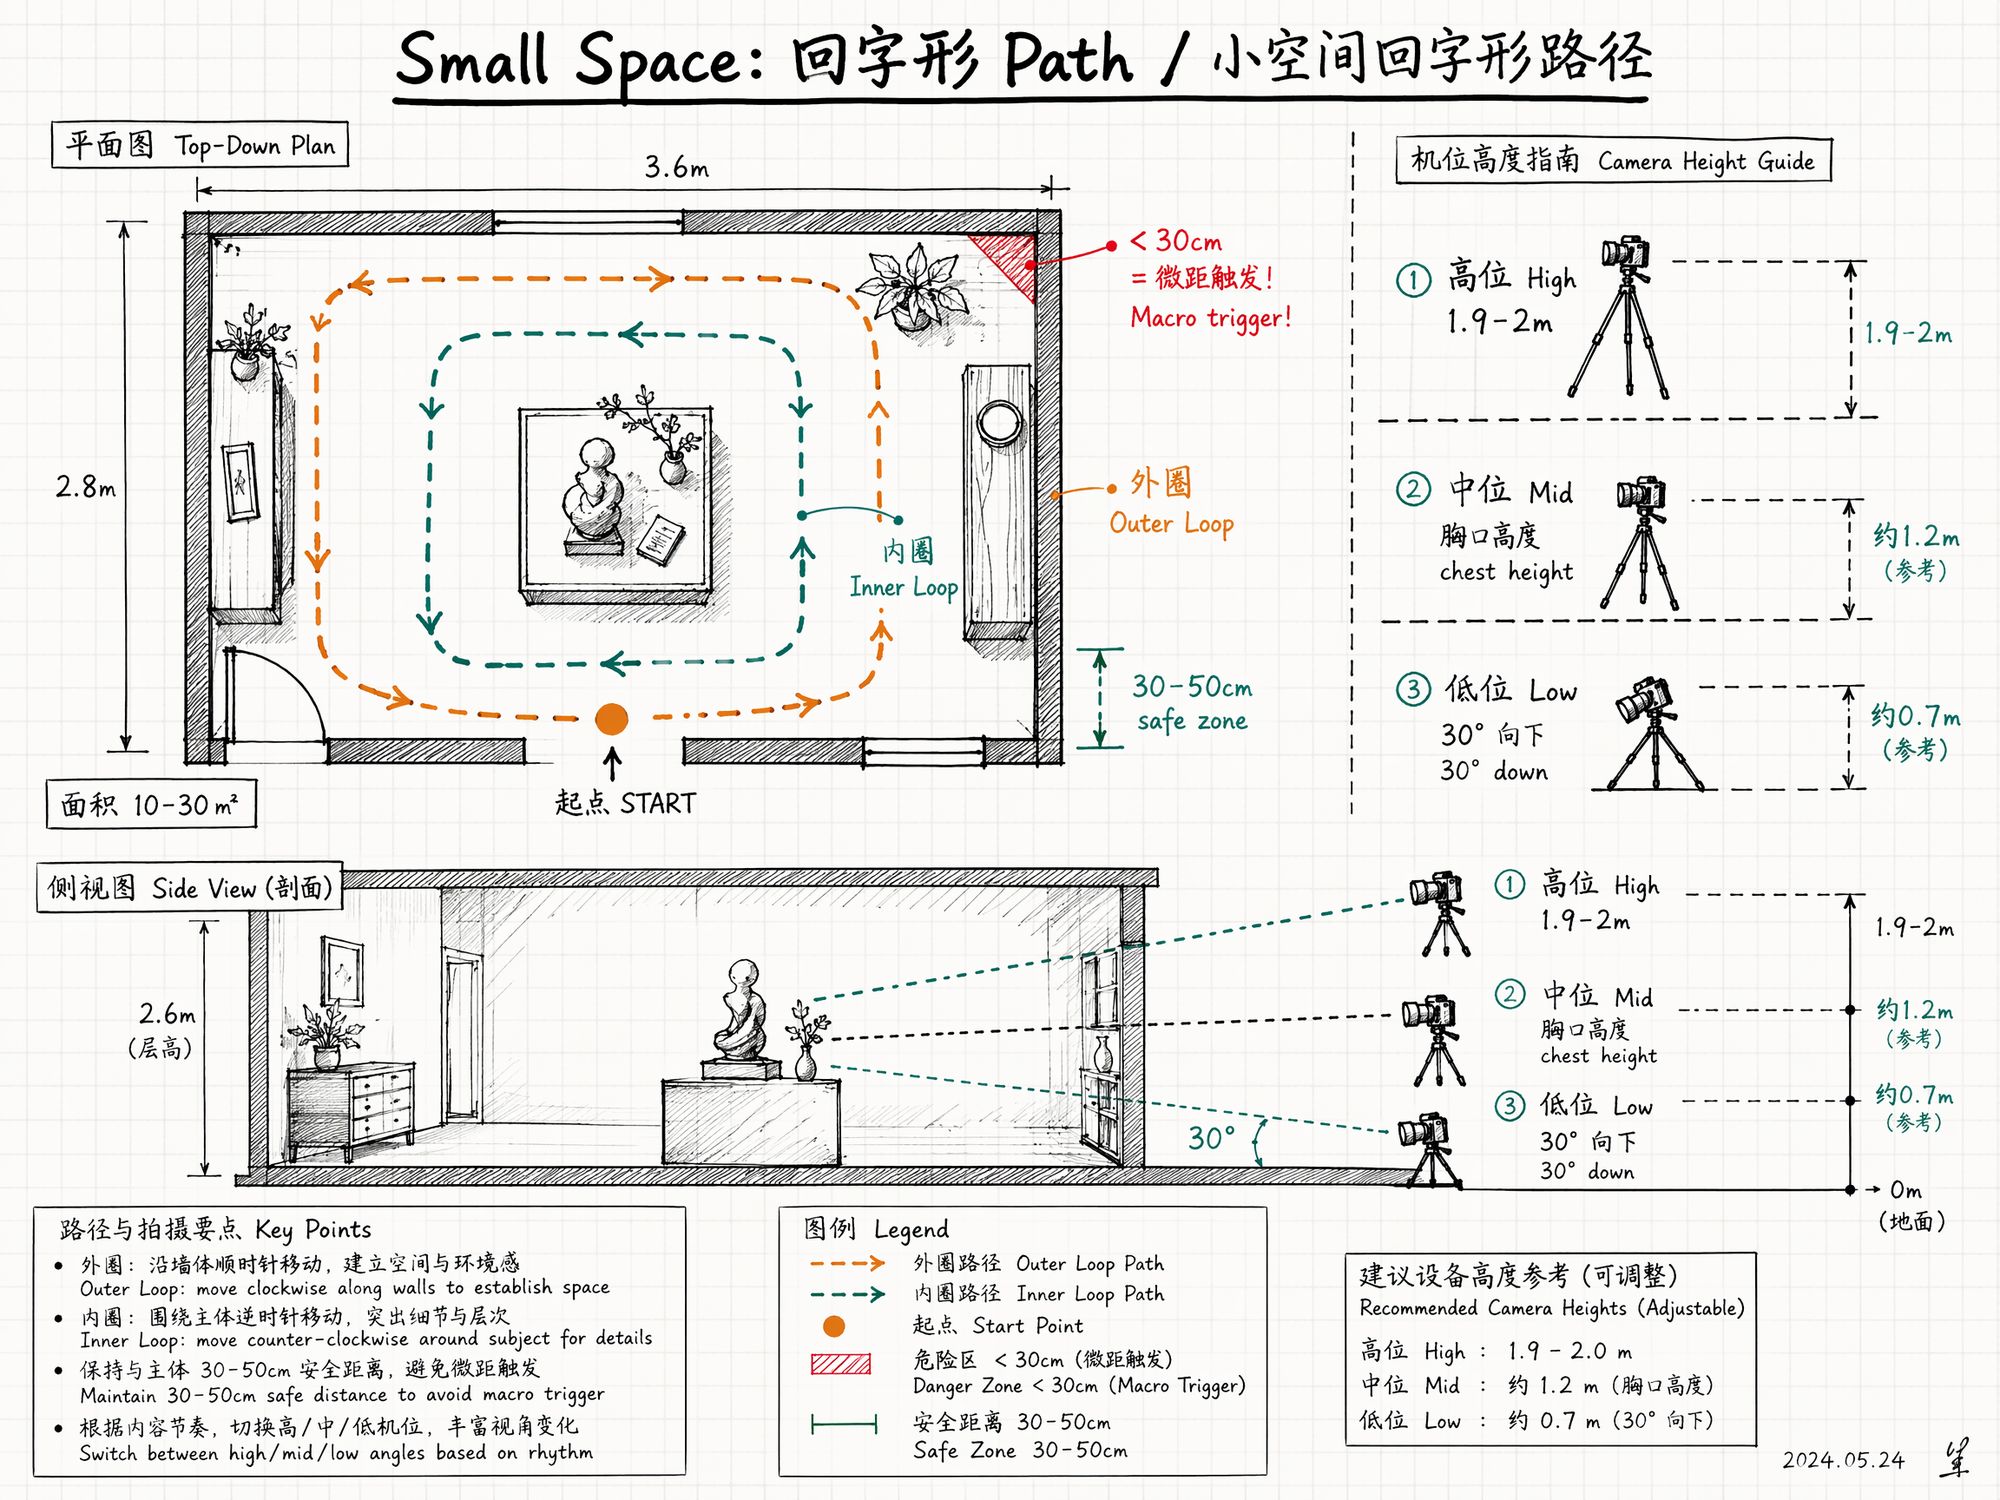
Small Spaces: The "Hard Nut" — No Room to Back Up
Small spaces (10–30㎡, like a single room) are 3DGS's hard nut. The reasons: you're only 1m from the wall, the frame is filled with featureless white wall; no continuous objects provide feature points; lens field of view isn't wide enough, each frame covers too little.
The solution: three-layer shooting + loop path.
Three-Layer Shooting
Switch between three heights to ensure no vertical information gaps:
| Height | Value | Lens direction |
|---|---|---|
| High | 1.9–2m (raised overhead) | Level or slightly down 10° |
| Mid | Chest height ~1.3m | Level |
| Low | Bent over ~0.7m | Down 30° |
Transitions between layers still need 5–6 gradual frames — never jump heights abruptly.
Loop Path Pattern
┌─────────────────────┐ │ ←──── Start ──────
│ │ ↑
↓
│
Outer loop: walk along walls │ │
┌───────┐
│
│ │ │
│
←─→
│
│
│
Inner loop: orbit central object │ │
│
↑
│
│
│ │ │
└───────┘
│
│
Key objects: extra 3 orbits │ ↓
↑
│ │
───── End ─────→
│ └─────────────────────┘
Outer loop follows walls (facing opposite wall), inner loop orbits central object (facing inward), key objects get 3 extra orbits (high/mid/low).
Three Traps in Small Spaces
Trap 1: Macro trigger. Phone cameras switch to macro mode when <30cm from an object — only a small area is sharp, background completely blurred. Algorithm fails immediately. Maintain 30–50cm safe distance; step back and use 0.5× ultrawide rather than getting close.
Trap 2: Rotating in place. Standing against a wall and spinning 360° ≠ full coverage. The algorithm sees only "a panorama from one point" with zero depth. You must have a translational trajectory.
Trap 3: Featureless white walls. 3DGS's worst enemy. Three rescue techniques:
• Step back: Include ceiling, floor, and wall in one frame — give the algorithm 3 reference planes
• Shoot at an angle: Photograph walls obliquely so edge lines enter the frame
• Add texture: In your own space, hang a painting or poster as a feature anchor point
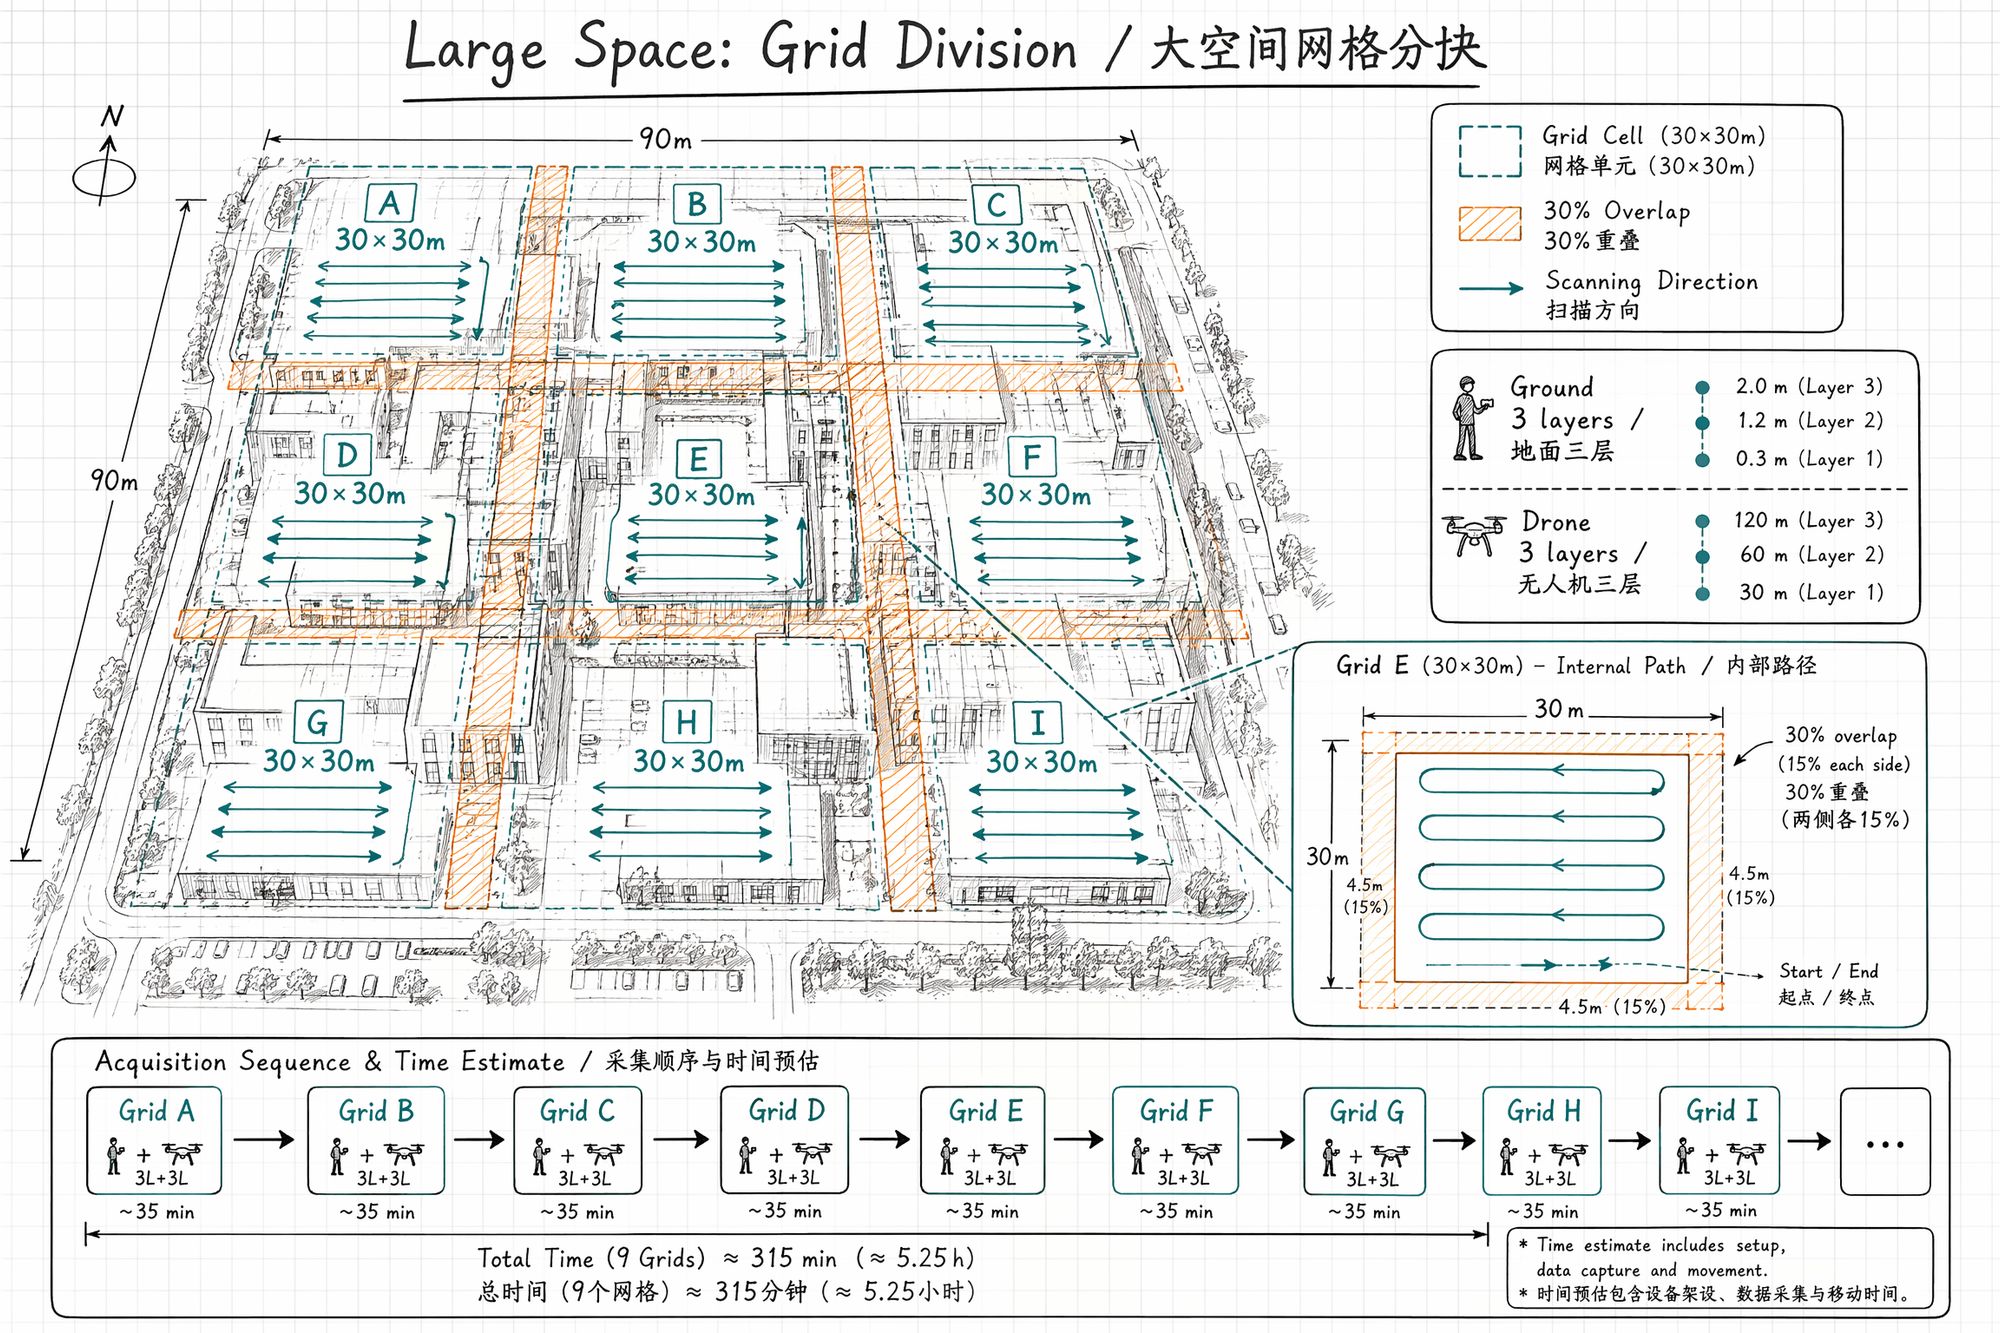
Large Spaces: The Opposite Problem — Insufficient Coverage
Large spaces (buildings, campuses, city blocks) have the opposite problem — you can never cover everything in one pass. 500 shots sounds like a lot, but spread across all facades of a three-story building, each angle gets only 2–3 shots — far from enough.
The solution: grid segmentation + multiple flights.
Grid Segmentation Method
-
Divide the large space into 30×30m grid cells
-
Each cell gets a complete three-layer pass (ground 3 layers + drone 3 layers)
-
Leave 30% overlap between cells for SfM stitching
-
Each cell: estimated 80–150 shots (ground) + 50–100 shots (drone)
A 100×100m building complex requires approximately 9 cells × 150 = 1350 ground shots + 9 × 80 = 720 drone shots, totaling ~2000 images. Complete over 2–3 days (same time window each day to ensure lighting consistency).
Handling Moving Objects
3DGS assumes the scene is static. Anything that moves between two frames becomes a chaotic mess of floater artifacts.
| Object | Handling |
|---|---|
| Pedestrians, pets | Wait for them to leave. Or mask out in post |
| Wind-blown leaves, flags | Choose calm conditions, or actively avoid these angles |
| TV screens | Turn off (screen content changes every frame) |
| Clocks (moving hands) | Remove, or mask in post-training |
| Running water, fountains | Keep for aesthetic "silk" effect; turn off for precision |
| Construction vehicles, workers | Shoot during off-hours |
Next Steps
• Finished shooting, how to organize files → Enter 04-Dataset Organization & Archiving
• Shot video, how to extract frames → Enter 05-Video Frame Extraction & Quality Filtering
• Photo colors inconsistent → Enter 06-Color Grading & White Balance Unification
• ← Previous chapter: 02-Site Recon & Shot Planning